
Installation Guide


InstallatIon InstructIons
for Vinyl Patio Doors without Nailing Fin (JII015)
3
1
REMOVE PACKAGING AND INSPECT PATIO DOOR
2
INSPECT ROUGH OPENING
REMOVE PACKAGING
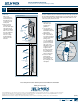
Remove shipping materials such as corner covers, shipping blocks or
pads. Remove any temporary handles just prior to installation into the
rough opening. Flush n doors will have a wood or cardboard support
on the sill. Remove the support and then remove the nailing n if
present. To remove the nailing n, score the nailing n with a utility
knife as close to the frame as possible, then bend back and forth until it
snaps off.
FOR RETROFIT INSTALLATIONS
For nless/block frame doors, remove the entire old patio door.
Removing the exterior wall surface is not necessary if the opening has
been evaluated to be structurally sound and water tight. Repair any
problems before continuing.
For ush n doors, remove the old door panels and the sill. Remove
enough of the bottom of both side jambs to allow for a sill pan to be
installed - details in following section.
INSPECT PATIO DOOR
•Cosmetic damage
•Product squareness (diagonal measurements must be within 1/4"
difference)
•Correct product (size, color, grid pattern, handing, glazing, energy-
efciency requirements, etc.)
•For side-by-side mulled units, a drip cap that extends the length of the
frame plus 1/8" overhang on each end is required.
•Included parts (See Parts List above)
If any of the above conditions represent a concern, or if you expect
environmental conditions to exceed the patio door's performance
rating, do not install the patio door. Contact your dealer or distributor
for recommendations.
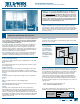
Verify Square, Level, and Plumb
A
B
D
C
E
ALL INSTALLATIONS
•Verify the width and
height of the patio
door are each
1/2"- 3/4" smaller
than the rough
opening width/
height. Mulled
units should be 3/4"
smaller.
•Verify the rough
opening is square.
The (A) and (B)
measurements
should be the same.
Maximum allowable
deviation from square
is 1/4".
•Verify the rough
opening is level and
plumb (C) and (D).
The maximum allowable deviation is 1/8".
•The rough opening sill must not be crowned or sagged (D).
•The exterior face of the rough opening must be in a single plane (E)
with less than 1/8" twist from corner to corner.
•Minimum double studs should be used at all wood framed rough
openings.
•The header must be supported by trimmer studs.
MATERIALS AND TOOLS - CONTINUED
•Hacksaw (SureSill sill pan)
Cutting shears (fabricated sill
pan)
•Tape measure
•Utility knife
•Level (4' minimum
recommended)
•J-roller
•Caulking gun
•Drill with bits
•Clean rags
•Screwdrivers
NEEDED TOOLS