
Installation Guide


InstallatIon InstructIons
for Vinyl Patio Doors without Nailing Fin (JII015)
9
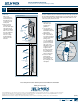
•Remove the pre-
installed screws from
the strike plate and
replace them with
the remaining #10 x 2
1/2" screws from the
hardware pack. This
will increase security
by attaching the patio
door to the structure.
FINISH INSTALLATION
•Drive two #10 x 2
1/2" screws (included
in hardware pack)
through the open
screw holes in the
strike plate.
7
COMPLETE INSTALLATION - CONTINUED
Premium Patio Door
Replacement screw
Pre-installed screw
Pre-installed screw
Builders Patio Door
Pre-installed screw
Replacement screw
Pre-installed screw
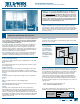
CONTINUOUS AIR SEAL
Create a continuous air seal on the interior between the rough opening
and the door frame with backer rod and sealant or low expansion foam.
Allow the foam to fully cure and cut ush with a sharp knife. Make sure
the foam cuts cleanly and doesn't tear.
AFTER INSTALLATION
1. Cover the screw holes
in the frame with the
provided vinyl caps.
2. Install exterior wall
surface (if applicable)
per manufactures'
guidelines.
3. Seal any gaps or
openings at end of
horizontal mull joints
with sealant.
4. For ush n doors,
apply sealant on
the exterior where
the ush n meets
the wall. For nless
doors, seal the gap
between the door
frame and rough
opening (or as wall
detail dictates) with
backer rod and
sealant.
5. Protect recently
installed units
from damage from
plaster, paint, etc.
by covering the unit
with plastic.
6. Remove labels or
other materials
adhered to glass within 30 days after installation.
Backer rod
Gap
Rough
opening
Door
frame
Sealant joint
©2012 JELD-WEN, inc.; This publication and its contents are owned by JELD-WEN, inc. and are protected under the U.S. Copyright Act and other intellectual property laws.
All trademarks, service marks, logos and the like (whether registered or unregistered) are owned or controlled by JELD-WEN, inc. or others. Unauthorized use or duplication
of JELD-WEN intellectual property is prohibited.
JELD-WEN reserves the right to change product specications without notice. Please check our website, jeld-wen.com, for current information.
(12/12)
Please visit www.jeld-wen.com for warranty and care and maintenance information.
Thank you for choosing
Gap