
Installation Guide

INSTALLATION INSTRUCTIONS
for Vinyl Patio Doors with Integral Nailing Fin (JII006)
5
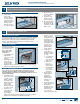
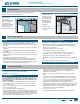
SPRAY ADHESIVE/PRIMER
Apply spray adhesive
per manufacturer’s
instructions (protect
door from overspray)
to nailing n,
sheathing, and
building wrap around
the patio door as
shown.
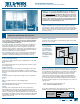
3. Shim the head jamb 4" from the corners of each panel.
4. Conrm the patio door for square, level, and plumb. Test for proper
operation (remove and reinstall if necessary).
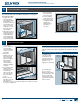
SECURE PATIO DOOR
Note! Fastener heads must be ush. Do not dent nailing n. Always
use pre-punched holes or pre-drill with a 3/16" bit.
Patio doors will be
fastened according
to performance
rating. This rating is
located on the gold
AAMA label xed
somewhere on the
frame, generally in
the head jamb. Look
for something like this
example: R-PG20-
3645X2426 (144X96)-
SD. If this label is
missing, use the PG35
and above fastener
pattern below. Fasten through nailing n holes as follows:
•PG20--4" from the corners and every 12" on center.
•PG35 and above--4" from each corner and every 8" on center.
APPLY DRIP CAP (IF APPLICABLE)
1. Apply 1/4" bead of
sealant to header as
shown.
2. Center drip cap on
the header with 1/8"
overhang on each
end.
3. Nail drip cap in place
as shown.
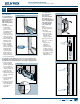
SHIM THE JAMBS
Note! Secure all shims with sealant.
1. From the interior,
shim the operating
panel side jamb 4"
from the corners
and at the strike
plate. Align shims
so that strike plate
screws (installed
later) will each
penetrate a shim.
2. Shim the stationary
panel side jamb 4"
from the corners
and at center.
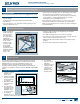
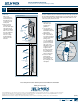
Warning! To avoid injury, use at least two people to install. Adequately
support the door until fully installed.
1. For continuous slab
landings only, score and
remove nailing n at sill.
2. If installing a pre-
formed sill pan,
follow manufacturer's
instructions and skip
this step. If installing a
job site fabricated sill
pan, run a continuous
3/8" bead of sealant
along the sill pan back
dam. When the frame
is installed, make
sure the frame makes
solid contact with the
sealant. Add more sealant if necessary.
3. Tilt patio door into the rough opening. Adequately support the door
until fully installed.
4. Fasten patio door between 3" and 4" from one lower corner.
5
6
INSTALL PATIO DOOR
FLASH PATIO DOOR
3"- 4"
Strike
plate
4"
4"
Interior
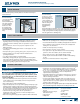
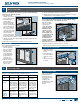
PREPARE FLASHING
Cut pieces of self-adhesive ashing to length as follows:
S
p
r
a
y
A
d
h
e
s
i
v
e
Width of ashing
Sealant
4" Flashing 6" Flashing 9" Flashing
One header
piece
10" longer than
the header
14" longer than
the header
20" longer than
the header
Two side
pieces
for continuous
slab landings, 3"
longer than the
sides, or for step-
down landings,
3" + the height
of the step
for continuous
slab landings, 5"
longer than the
sides, or for step-
down landings,
5" + the height
of the step
for continuous
slab landings, 8"
longer than the
sides, or for step-
down landings,
8" + the height
of the step
For step-
down
landings
only, one
sill piece
6" longer than
the sill and 1"
narrower than
the height of the
step
10" longer than
the sill and 1"
narrower than
the height of the
step
16" longer than
the sill and 1"
narrower than
the height of the
step