
Installation Guide
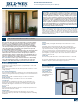


INSTALLATION INSTRUCTIONS
for Pre-Hung Exterior Entry Doors (JII106)
6
INSTALL DOOR
6
Warning! To avoid injury, use at least two people to install. Adequately
support the door until fully installed.
PREPARE DOOR
1. On the interior side,
apply a continuous
bead of silicone
sealant where the
exterior trim meets
the door frame as
shown. Tool into a
llet shape.
2. Apply a 3/8"
continuous bead of
sealant across the sill
pan back dam and
over the ashing
joints as shown.
INSTALL DOOR
WARNING! If installing fasteners through fiberglass components, we
recommend pre-drilling holes to keep the fiberglass from splitting.
Note! This section covers single door, double door, and doors with a
transom or a sidelite(s) already installed by the factory.
1. Remove any pre-hanging clips that are fastened to the outside of
the jamb that will be covered when the unit is placed in the rough
opening. Adequately support the slab to keep it from swinging open
during installation.
2. For units with
brickmould trim,
apply a 3/8" bead
of sealant to the
back of the trim
where it will contact
the structure. From
the outside, tilt the
entire pre-hung door
into the center of
the opening. Make
sure the sill contacts
the sealant on the
sill pan back dam
(upturned leg on
theinterior).
3. Temporarily fasten
the door as follows.
For metal frames,
drive a nail or screw
through one lower
hole in the ange.
For doors without
a sidelite(s), secure
the hinge jamb by
placing one 10d
casing nail (or one
#8 x 2-1/2" deck
screw) horizontally
centered in the hinge
jamb or brickmould
trim 20" from the
top and bottom
(or just above the
lower hinge) of the
door. Do not set
nails/screws. For
appearance reasons,
fasteners can be
driven behind (but
not through) the weatherstrip if desired. Secure sidelite(s) in a similar
manner through the frame and into the wall.
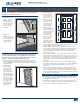
4. From the inside, shim the jambs as follows: One shim on each end
of the sill (between jamb and sill, not under sill). Single/double units
at each hinge location and at the strike plate. Units with sidelites,
between the sidelite and wall in at least 3 places until the door is
square in the opening.
5. For doors with metal frames, secure with nails or screws through the
provided holes in the frame either above or below every oval slot. For
all other doors, temporarily fasten the latch jamb by placing one 10d
casing nail (or one #8 x 2-1/2" deck screw) horizontally centered in
the latch jamb 16" from the top and bottom of the door. Do not set
nails/screws.
6. Verify the door unit is square, then securely fasten the hinge jamb
by setting the two nails or screws installed earlier. Add an additional
nail or screw centered between the rst two and one 4" from
eachcorner.
7. Remove any remaining pre-hanging clips. Be sure the door opens
freely and that the space between the door and the jamb is even on
all sides. Adjust if necessary by loosening or removing the strike jamb
fasteners and adjust until there is even contact between the slab and
weatherstrip. Secure all fasteners.
DOUBLE DOOR, SIDELITE OR TRANSOM INSTALLATIONS
1. If installing a door with a sidelite(s), shim the head on both sides of
the joint where the sidelite joins the door jamb. Fasten next to the
shims and then remove shims.
2. Shim the head of double door units or units with sidelite(s) at the
center of each slab/sidelite. Fasten next to the shims and then remove
shims. Fasten a transom in a similar manner every 16".
Sealant
Sealant
Fastener
20" 16"
20" 16"
Shim Locations