
Installation Guide

INSTALLATION INSTRUCTIONS
for Swinging and French Patio Doors
6
7
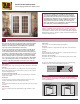
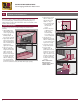
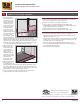
INSTALL DOOR
Warning! To avoid
injury, use at least
two people to install.
Adequately support the
door until completely
fastened.
1. Apply a 3/8" bead
of sealant where
the back of the trim
meets the frame.
Tool into a llet
shape. Run another
bead of sealant
along the back of the
n/trim where it will
contact the structure.
2. Tilt the door into the rough opening, making sure the inside of the
door sill is fully seated into the sealant on the sill pan back dam.
3. Secure the door in the rough opening by pre-drilling holes and then
driving #8 x 3" drywall/deck screws into the thick part of the jamb
where shown. Do not fully seat screws.
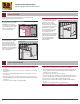
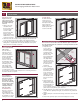
SHIM PATIO DOOR
Note! Secure all shims
with sealant.
From the interior,
shim the head and
side jambs 6" from
the corners and at 8"
intervals. Install shims
at the strike plate
and at each hinge
location so the screws
(installed later) will
each penetrate a shim.
If installing a door
with a hinge jamb
in the middle, shim
underneath the mull
for support. Shim so the
door is square, level and plumb. Verify there is a 1/8" margin between
the frame and the door panels.
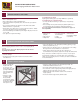
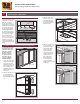
SECURE THE DOOR
Note! Vinyl door
instructions later in
this section. All others
begin here. Double
door units are shown,
however, the fastening
instructions also apply
to triple, quad and
sidelight French and
patio door units.
For French Doors:
Remove a screw from
each hinge next to
the weatherstrip and
replace with one of the
provided #8 x 3" screws,
seating all screws fully.
6"
6"
Strike
plate
For Patio Doors:
Pre-drill and install
four more #8 x 3"
screws through the
thick part of the jamb
where shown in a
similar manner to those
installed previously.
Seat all screws fully.
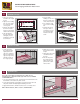
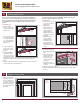
VINYL FRENCH AND PATIO DOORS:
Note! Use the six screws that come in the hardware pack to install the
door. The hardware pack also contains six screw caps and a #25 torx bit
to install the screws.
1. Verify the door
is level, square
and plumb. Check
for even margins
around all panels
and the frame and
that the lockset
holes (if applicable)
align properly. If
not, adjust shims.
Once the screws are
captured in the jamb
jacks, they cannot
be removed and
reinstalled.
2. Use the jamb jack
screws and TORX bit
(provided) to initially
secure the frame
to the opening at
locations 1 & 2. Turn
jamb jack screws #1
& #2 until they click
twice. Do the same
for #3.
3. Check the inside of
jamb on the #1 side
for plumb and adjust
by turning jamb jack
screws clockwise to
move toward the jamb, or counter clockwise to move away from the
jamb. Check unit for plumb, square and level.
4. Turn #4 jamb jack screw until it clicks twice. Adjust jamb jack screws
on the #4 side to plumb jamb. Again, check unit for level, plumb and
square.
5. Tighten jamb jack screws #5 and # 6 being careful not to bow the side
jambs.
6. Check unit for plumb, square and level and adjust as necessary.
3
1
5
4
2
6
Rough
opening
Door
frame
Jamb
jack