
Operating Guide

PRODUCT GUIDE
Wood Patio Doors (JPG012)
11
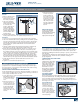
SINGLE AND MULTI-POINT SWINGING DOOR 90
O
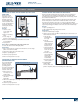
TURN CYLINDER
Removal
1. Remove cylinder screw.
2. Loosen set screw on
knob and remove knob
from body ofcylinder.
3. The arrow and drive
tab must be pointing
down. If the tab cannot
be rotated to this
position, push the pin
down with the ring
wrench to disengage
the stops and turn the
cylinder shaft until the
arrow and drive tab is
pointingdown.
4. Hold the cylinder shaft
in this position and remove the cylinder body from the door.
Installation
1. Loosen set screw on knob and remove knob from body of cylinder.
2. The arrow and drive tab must be pointing down to install the cylinder
into the lock mechanism If the tab cannot be rotated to this position,
push the pin down with the ring wrench included to disengage the
stops and turn the cylinder shaft until the arrow and drive tab is
pointing down.
3. Hold the cylinder shaft in this position and insert the cylinder body
into the door so the tab on the cylinder is inside of the lock.
4. Rotate the shaft that the thumb turn attaches to so that the top of
the post moves toward the edge of the door or insert the key into
the cylinder and rotate so the top of the key moves towards the edge
of the door This will extend the deadbolt If the post or key is rotated
the wrong direction, it will rotate approximately 120
o
and lock up
where it cannot be rotated in either direction. If this happens, push
the pin down with the ring wrench included to disengage the stops
and turn the key in the opposite direction until the deadbolt extends.
5. Fix knob horizontally on cylinder shaft with set screw hole on
thebottom.
6. Tighten set screw and install cylinder screw.
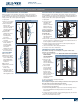
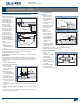
SWINGING PATIO DOOR LOCK HANDING CHANGE
Change handing if the lock latch is not facing the right direction for
your patio door. To determine handing, hold locking mechanism up to
the active panel in correct position. If the at side of the latch is facing
the jamb, change the handing.
CARADCO FRENCH MANOR/FRENCH VIEW AND W-2500
For the French Manor, if you need to change the handing, you will need
a new astragal assembly and sweeps. For the French View, you will need
a new astragal assembly. Call us to order.
1. Locate latch release on side of mechanism behind the latch.
Depending on the door
model, it will either be
a set screw or a metal
lever.
2. If the latch release is a
set screw, remove set
screw from hole in side
of mechanism (may be
clearly marked) with
2mm or 5/64" Allen
wrench. Remove lock
latch, rotate 180°, and
reinsert.
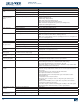
90
o
Turn Cylinder for Swing Doors
Key
Cylinder
Cylinder
shaft
Knob
Pin
Drive
tab
Ring
wrench
Set
screw
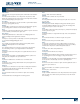
HARDWARE REPLACEMENT AND ADJUSTMENT - CONTINUED
Set screw
hole
Latch
Set
screw
Handle
Latch
Face
plates
Spindle
bar
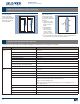
Horizontal-Vertical Adjustment Hinge
Panel
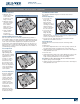
3. If the latch release is
a metal lever, insert
small screwdriver in
slot and move metal
lever as shown. Latch
should pop out. With
ngers, rotate latch
180°, and press back
into place until latch
automatically locks
back in.
NORCO AND SITELINE
Single point and Multi-
point handing can be
changed by simply pulling
the tapered latch out
slightly and rotating 180
o
.
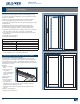
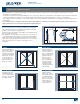
SWINGING DOOR HINGE ADJUSTMENT
Proper adjustment of a swinging door panel occurs when there are
even sight lines both vertically and horizontally, and there is sufcient
contact between the weatherstrip and the frame and to prevent the
panel(s) from rubbing and allow the panel(s) to operate, seal, latch and
lock smoothly.
Correct improper alignment by making adjustments to the hinge
adjustment screws, 1/4 turn at a time, and then checking for
properalignment.
STANDARD NON-ADJUSTABLE HINGE
Make horizontal
adjustments by deepening
the hinge rout depth on
frame with a chisel and
adding hinge shims (thin
plastic or wood plates)
behind the necessary
hinge plate(s). The hinge
should be ush with the
wood surface.Call us to
order hinge shims.
HISTORICAL INSWING
ADJUSTABLE HINGE
There are two types of inswing adjustable hinges: H (Horizontal) and
H-V (Horizontal-Vertical). The H hinge allows horizontal adjustment,
and an H-V hinge allows both horizontal and vertical adjustment. A
panel has one H hinge at the bottom, one H hinge at the top, and one
H-V hinge in the center.
Vertical Adjustment
With 1/4" open-end
wrench, turn screws
counter-clockwise in
“V” slot in H-V hinge at
center to move panel
up or down to desired
position. If the door panel
needs to go up or down
in the opening, adjust the
vertical (V) hinge.
Frame
Latch
Metal lever
Adjustment
screws