
Operating Guide

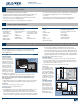


PRODUCT GUIDE
Wood Patio Doors (JPG012)
7
Because panel removal can be awkward and could cause physical injury
or product damage, we recommend the help of additional people.
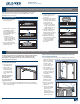
OPERATING PANEL
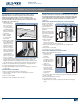
All inswing doors will have a removable hinge pin. Some (typically
outswing hinges only) may have a set screw on the barrel that will have
to be loosened to allow the pin to come out. Standard hinges have the
set screw in the center of the barrel, outswing adjustable hinges have
the set screw on the bottom. If the hinge is on an outswing door and
does not have a set screw, the pin is not removable and the hinges will
need to be removed to remove the panel.
1. Open panel about
half way and hold
steady with the help
of a second person.
2. With a small
screwdriver or nail
punch and hammer,
drive hinge pin from
bottom hinge, then
top hinge.
3. For French View
outswing, remove
center hinge by
removing screws
from hinge on door panel.
4. For all other door models, remove hinge pin from center hinge, then
remove panel.
5. To install panel, perform removal steps in reverse.
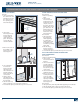
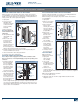
INSWING STATIONARY PANEL - NORCO AND SITELINE ONLY
Score (cut) any paint joining wood parts before removing them.
1. Remove inside
stop by gently
prying with a putty
knife. Set aside for
reinstallation.
2. Remove the screws
that are now exposed
from underneath the
inside stop.
3. The panel can now
be removed to
theinterior.
Installation
1. Place the new panel into the frame.
2. Lift and shim the bottom of the new panel above the threshold until
it is even with the other panel(s).
3. Drive screws through the pre-drilled holes, securing the panel to
theframe.
4. Reinstall the inside stops and tack into place.
Hinge
pin
Glass
Frame
Inside
stop
Possible
set screw
locations
SWINGING PATIO DOOR PANEL REMOVAL AND INSTALLATION
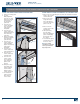
HARDWARE REPLACEMENT AND ADJUSTMENT
Note! Hardware styles have changed over the years and may vary
slightly from the illustrations in this document.
HARDWARE TYPES
• Metal hardware offers functionality, aesthetic appeal and resistance
to corrosion but is not totally corrosion proof.
• Plastic hardware offers high resistance to the elements however, over
time it can deteriorate from ultraviolet light, heat, cold, and chemical
exposure.
• Brass hardware has a special protective lm to reduce/eliminate
polishing and requires special care.
• See our complete Care and Maintenance document at
www.jeld-wen.com for more information on cleaning and
lubricatinghardware.
Screw hole repair and hardware alignment, or realignment, are
common tasks for any hardware replacement component. Follow these
instructions if screw holes become stripped and/or if hardware no
longer functions properly due to misalignment.
SCREW HOLE REPAIR
1. Cut wooden toothpicks or appropriate sized wood dowel to t screw
hole just below wood surface.
2. Fill screw hole with wood glue.
3. Insert toothpicks or dowel; let dry.
4. Fill to surface with wood putty; let dry.
5. Sand smooth and renish; let dry.
6. Drill new pilot hole.
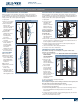
HARDWARE ALIGNMENT
Misalignment can happen if screws have become stripped and cannot
be tightened. This alignment will create new screw holes.
1. Remove hardware.
2. Repair screw holes according to the procedure above.
3. Mark new screw holes as follows:
• Lay hardware in position and hold in place.
• If replacing a lock, turn latch to lock position to engage keeper.
• Mark new screw locations through screw holes.
• Remove hardware and set aside.
4. Drill pilot holes with 1/16" drill bit at new marked screw hole
positions no deeper than screw length.
5. Install hardware.
6. Test operation; if not operating properly, call us for assistance.
BLINDS BETWEEN THE GLASS
For easiest operation, keep the slats in a fully open position while
operating.
ADJUSTMENTS
1. If the operator comes off of the track, hold the operator at a sharp
angle to the glass and reinsert the two legs under the track opening.
2. Re-couple the operator magnets.
RE-COUPLE OPERATOR MAGNETS
1. Slide the operator past the half-way engagement point until the
rstclick.
2. Continue to the full engagement point until the second click.