
Use and Care Guide


10
PREPARE TO FINISH - CONTINUED
PREPARE WOOD SURFACE
PREPARE DOUBLE-HUNG SASH
On double-hung windows, the moving sash stile edges that come in
contact with the jamb liners need to be sealed, not painted. The sealer
should be a high-quality waterproong product applied to the sash edge
to adequately seal the wood while not causing operational problems.
Minimize the lm thickness on the sash edge. Sash stile edges that
have weatherstrip and do not come in contact with the side jamb
or jamb liner may be painted the same as the rest of the window.
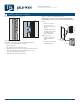
PREPARE PHANTOM SCREEN
®
Non-Removable Screen Tracks: Casement and Awning Windows
1. Open window.
2. Remove the housing cover
by tilting the cover upward
to detach from the housing.
Once cover detaches,
carefully pull away).
3. Reattach housing cover once
stain is thoroughly dried.
Removable Screen Tracks: Double-Hung and Horizontal Gliding
Windows
1. Grip lower end of the
screen track.
2. Applying even, steady
pressure, carefully pull the
track until it releases from
its holding clip.
3. Continue pulling bottom
of track until it is 6 inches
away from the stile.
4. Tilt track toward you and
pull down and away from
housing cover.
5. Repeat steps 1-4 to remove remaining track.
2
3
Proper wood surface preparation is essential before nishing. Clear coat renishing may vary depending on the type of nish previously
used. Mildew stains must be removed before nishing or renishing. Seek professional help if unsure. This section covers wood preparation
for exterior and interior, new and previously nished wood surfaces.
1. Remove (double-hung, single-hung, slider) or open (casement,
awning, basement) sash before nishing. Allow the sash to
completely dry before reinstalling or closing.
2. Remove or protect hardware and other non-wood items such
as gaskets, hinges, locks, jamb liners and weatherstrip from
nishing and/or damage. Do not allow nishing products to
come into contact with these parts.
3. Remove all loose, peeling, aking, or scaling paint without
gouging the wood surface.
4. Fill all holes, gouges, scratches, dents (see following tip), or
other imperfections with wood putty.
Note! Water-based putty can react with screws, nails and
staples and cause rust stains on the wood surface.
TIP: Use the following method to steam away dents (if wood bers
are still intact):
a. Place a drop or two of water on the dent.
b. Let soak.
c. Cover with a wet cloth.
d. Heat with tip of a warm iron.
e. Let dry thoroughly.
5. Sand smooth (with the grain) any surface roughness with a
cork, felt, or rubber-backed sanding block to avoid uneven
depressions in the wood. Sand with the folded edge of the
sandpaper facing the direction of travel (an open edge is more
likely to catch under a sliver of wood and lift it).
6. Apply sufcient sealant/caulk to joints where wood parts come
together to prevent moisture access (100% silicone if left
exposed, 100% polyurethane if painted).
7. Thoroughly remove dust from wood surface (nish will not
adhere properly to unclean surface) with a vacuum, tack cloth
or damp rag. If necessary, use paint thinner to clean oil, wax or
grease. Do not use compressed air because moisture in air could
cause water spotting.
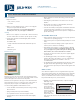
Housing
cover
Fixed screen
track
Holding
clip
Screen
track
FINISH WINDOW OR PATIO DOOR
Note! Do not nish hardware or other non-wood parts such as
hinges, jamb liners or locks. If nishing products do come into
contact with these parts, immediately wipe with a clean rag.
1. IF painting, apply primer (two coats for damaged areas) to all
exposed wood surfaces (including top and bottom of sash) and
let dry thoroughly.
IF staining, apply stain as desired. More stain will result in a
darker nish, less stain in a lighter nish.
2. After primer/stain is dry, apply top coats to all exposed wood
surfaces.
3. After the last top coat is completely dry, reinstall hardware,
weatherstrip, etc. Operational problems may occur if the top
coat is not thoroughly dry.
4. Reinstall sash or panel.
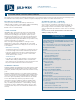
Staining Phantom Screens
®
1. Stain both exterior and
interior of left and right
tracks.
2. Stain housing cover
located at the top of your
window.
3. Stain handle being
careful not to stain the
mesh screen material.
4. Reassemble components
in reverse order when
staining is complete and
thoroughly dried.
4
Apply nish applications in multiple light coats. Apply at least two top coats of paint over primer or high grade clear coat over stain. Apply
material evenly, and follow label instructions for time between coats. Consult a local paint professional when staining pine and other soft
woods for methods to minimize uneven stain appearance, or for any other nishing problems.
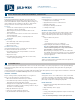
Housing
cover
Handle
Screen
track
CARE AND MAINTENANCE
Wood Windows and Patio Doors (JCM003)