
Installation Guide
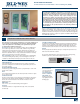


INSTALLATION INSTRUCTIONS
for Wood Patio Doors with Exterior Trim or Nailing Fin (JII026)
Newer construction methods have led to an increase in air and water
tightness in buildings. This frequently leads to negative air pressure
inside the home, which can draw water through very small openings. Our
installation method seals the patio door to the weather barrier (typically
building wrap) and uses a sill pan to capture and drain incidental water
from under the patio door.
Thank you for selecting JELD-WEN products. Attached are JELD-WEN’s
recommended installation instructions for wood patio doors with
exterior trim or nailing n. Read these instructions thoroughly before
beginning. They are designed to work in most existing applications,
however; existing conditions may require changes to these
instructions. If changes are needed, they are made at the installer’s
risk. For installations other than indicated in these instructions, contact
a building professional. Areas such as Florida and the Texas TDI region
have different anchoring requirements based on product certification.
For information on specific products, visit www.floridabuilding.org
or www.tdi.texas.gov and follow the anchoring schedule given in
the drawings for the product instead of the anchoring schedule in
this document.
IMPORTANT INFORMATION AND GLOSSARY
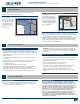
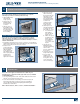
LANDINGS
These instructions
cover two patio door
sill conditions: the
step-down landing
and the continuous
slab landing. The
installation methods
vary slightly between
landing types.
Not all patio door types may be installed into every wall condition in all
areas. Consult your local building code official for applicable building
codes and regulations. Local building code requirements supersede
recommended installation instructions.
Please Note! Any patio door installation where the sill is higher than
35 feet above ground level or into a wall condition not specically
addressed in these instructions must be designed by an architect or
structural engineer. Failure to install square, level and plumb and on a
at surface (without twist or warp) could result in denial of warranty
claims for operational or performance problems.
Note to Installer: Provide a copy of these instructions to the building
owner. By installing this product, you acknowledge the terms and
conditions of the limited warranty as part of the terms of the sale.
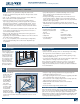
GLOSSARY
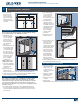
Applied Nailing Fin
A mechanically attached vinyl n that creates a ange around the
perimeter of the patio door and is used to position the patio door in
the rough opening.
Backer Rod (backing material)
A material (e.g. foam rod), placed into a joint primarily to control the
depth of the sealant.
Buck
A wood framework attached to the masonry inside a window or patio
door rough opening.
Continuous Air Seal
Backer rod and sealant or low expansion foam applied to the interior
gap between the product and the building in a continuous fashion
used to block air ow between the interior and exterior of the
buildingenvelope.
Mulled Unit
Two or more door units structurally joined together.
Pilot Hole
A drilled hole that is no larger than the body of the screw (minus
thethreads).
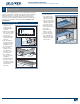
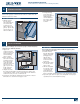
Step-Down Landing
Continuous
Slab
Landing
Self-Adhered Flashing (SAF)
An adhesive backed tape material, generally not requiring mechanical
fasteners, used to waterproof the rough opening and/or used to seal a
window to the building’s weather barrier. SAF should be applied in a
manner that directs the moisture out of the wall cavity to the exterior.
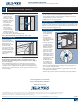
Shiplap
The layering method in which each layer overlaps the layer below it so
that water runs down the outside.
Please allow sufcient time to properly prepare the rough opening,
install the patio door, and ensure its proper operation.
Estimated Install
Time for New
Construction
First Time: 4.0 hr.
Experienced: 2.5 hr.
Professional: 1.5 hr.
12
6
1
11
2
10
3
9
8 4
7 5