
Installation Guide


INSTALLATION INSTRUCTIONS
for Wood Patio Doors with Exterior Trim or Nailing Fin (JII026)
3
• Verify the width and
height of the patio
door are each
1/2"- 3/4" smaller
than the rough
opening width/
height. Mulled
units should be
3/4"smaller.
• Verify the rough
opening is square.
The (A) and (B)
measurements
should be the same.
Maximum allowable
deviation from square
is 1/8" for doors less than 20 square feet and 1/4" for doors over 20
square feet.
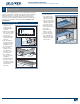
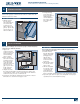
REMOVE PACKAGING
Remove shipping
materials such as corner
covers, shipping blocks
or pads. Remove the
skid board attached
to the bottom of the
door and save screws
for securing the sill.
Remove any staples
exposed on the frame,
but leave any glass
protective lms on.
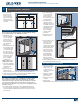
INSPECT PATIO DOOR
• Cosmetic damage
• Splits, cracks, holes, missing sections or other damage to the nailing
n longer than 6" and/or within 1/2" of patio door frame.
• Correct product (size, color, grid pattern, handing, glazing, energy-
efciency requirements, etc.).
• For side-by-side mulled units, a drip cap that extends the length of the
frame plus 1/16" overhang on each end is required.
If any of the above conditions represent a concern, or if you expect
environmental conditions to exceed the patio door’s performance
rating, do not install the patio door. Contact your dealer or distributor
for recommendations.
Skid board
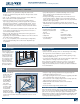
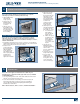
Verify Square, Level, and Plumb
A
B
D
C
E
• Verify the rough opening is plumb and level (C), (D) and (E). The
maximum allowable deviation is 1/8".
• The rough opening sill must not be crowned or sagged (D), but rather
level or sloped (positive slope) to the exterior.
• The exterior face of the rough opening must be in a single plane (E)
with less than 1/8" twist from corner to corner.
• Minimum double studs should be used at all wood framed
roughopenings.
• The header must be supported by trimmer studs.
FOR RETROFIT INSTALLATIONS
After removing the old patio door, remove sufcient cladding (siding,
stucco, etc.) to expose enough intact building wrap to properly seal the
patio door to the opening. If damaged, apply new building wrap in
shiplap manner. Verify the rough opening framing is structurally sound.
Contact your local waste management entities for proper disposal or
recycling of products being removed.
MATERIALS AND TOOLS - CONTINUED
REMOVE PACKAGING AND INSPECT PATIO DOOR
INSPECT ROUGH OPENING
1
2
• Finned products: 1 3/4" galvanized roong nails; Exterior trim
products: 3" galvanized casing nails. Fasteners must penetrate at least
1" into framing.
• 3/16" x 2 1/2" self-tapping concrete screws (for concrete suboors).
• Non-compressible or water degradable shims.
• Sill pan: It is best practice to use a pre-formed, rigid, positively
sloped, pvc pan that provides continuous support. We recommend
using SureSill
™
Sloped Sill Pan
™
, manufactured by SureSill
™
, Ltd. An
alternative would be a non-sloped pre-formed sill pan or one that
can be fabricated on site from metal or vinyl sheet material with the
proper tools.
• Sealant: We recommend OSI
®
QUAD
®
Max Sealant or equivalent. This
can be used in any application and can be painted or ordered in a
color matched product, if desired.
• Backer rod 1/8" larger than the widest portion of the gap (used in
conjunction with sealant bead).
• Polyurethane low expansion Window and Door foam: We recommend
OSI
®
QUAD
®
Foam or equivalent).
• 4", 6", or 9" (as required by local code and window conguration)
wide self-adhered ashing: We recommend OSI
®
Butyl Flash Tape
orequivalent.
• Spray adhesive/primer for self-adhered ashing. Such as Loctite
®
300 or equivalent. Follow manufacturer's instructions for
applicationmethods.
• For step-down landings only: Plastic drain screen with crisscross or
woven pattern (sold in 6" widths to protect rain gutters) and 3/8"
staples. The drain screen provides a path for air to dry any incidental
moisture in the rough opening.
• Drip cap material, if not supplied, required only for side-by-side
mulled units that extends the length of the frame plus 1/8" overhang
on each end.
NEEDED TOOLS
• Hacksaw (SureSill
™
sill pan)
• Cutting shears (fabricated
sillpan)
• Tape measure
• Utility knife
• Level (4' minimum
recommended)
• J-roller
• Caulking gun
• Drill
• Construction stapler
• Flat head screwdriver
• Impact driver and 3/32"
masonrybit