
Installation Guide


INSTALLATION INSTRUCTIONS
for Wood Patio Doors with Exterior Trim or Nailing Fin (JII026)
8
FLASH PATIO DOOR
COMPLETE INSTALLATION
8
9
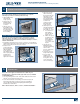
1. Seal the upper
corners of the patio
door with a 1/4"
bead of sealant. Tool
into a llet shape.
2. Release the building
wrap from above the
header (previously
taped up) and
overlap the header
ashing. Seal the
ends with self-
adhered ashing or building wrap tape.
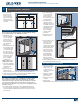
Sealant
Min. sizes or
other specied
4" Flashing 6" Flashing 9" Flashing
One header
piece
10" longer than the
header
14" longer than the
header
20" longer than the
header
Two side
pieces
for continuous slab
landings, 3" longer
than the sides, or for
step-down landings,
3" + the height of
the step
for continuous slab
landings, 5" longer
than the sides, or for
step-down landings,
5" + the height of
the step
for continuous slab
landings, 8" longer
than the sides, or for
step-down landings,
8" + the height of
the step
For step-down
landings only,
one sill piece
6" longer than the
sill and 1" narrower
than the height of
the step
10" longer than the
sill and 1" narrower
than the height of
the step
16" longer than the
sill and 1" narrower
than the height of
the step
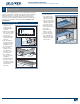
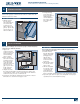
APPLY THE SELF-ADHERED FLASHING
Note! Keep the edge of the self-adhered flashing as close to the patio
door frame as possible.
1. If applicable, center
and apply the sill
piece underneath the
sill (bottom 1/2" of
the drain screen must
remain visible). Trim
drain screen and/or
ashing as necessary
to t the specic
wallcondition.
2. Apply the side pieces
at a point above the
head jamb that is 1"
less than the width
of the ashing and
proceed downward
along the side jambs.
3. Center and apply the
header piece above
the header.
4. Press the ashing
down with a J-roller.
5. Do not allow gaps
or bubbles beneath
self-adhered ashing
(remove and replace
if necessary).
Step
height
minus 1"
1"
Width of ashing
minus 1"
Width of
ashing
plus 1"
PREPARE FLASHING
Cut pieces of self-adhered ashing to length as follows:
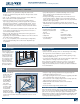
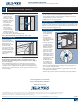
SPRAY ADHESIVE/PRIMER
Apply spray adhesive
per manufacturer’s
instructions (protect
door from overspray) to
nailing n, sheathing,
and building wrap
around the patio door
as shown.
S
p
r
a
y
A
d
h
e
s
i
v
e
Width of ashing
3. Ensure sealant on back dam of the sill pan fully seals to the inside
face of the sill. Apply more sealant as necessary.
4. Install lockset hardware per supplied instructions.
5. Some French double door units may require installing lock bolts at
the top and bottom of the inactive panel. Locate the center point of
each lock bolt, drill 3/8" bolt holes and install keeper plates.