
Installation Guide


INSTALLATION INSTRUCTIONS
for Wood Patio Doors with Exterior Trim or Nailing Fin (JII026)
9
Please visit jeld-wen.com for warranty
and care and maintenance information.
Thank you for choosing
©2014 JELD-WEN, inc.; This publication and its contents are owned by JELD-WEN, inc. and are protected under the U.S. Copyright Act and other intellectual
property laws. All trademarks, service marks, logos and the like (whether registered or unregistered) are owned or controlled by JELD-WEN, inc. or others.
Unauthorized use or duplication of JELD-WEN intellectual property is prohibited.
JELD-WEN reserves the right to change product specications without notice. Please check our website, jeld-wen.com, for current information.
(11/14)
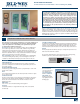
COMPLETE INSTALLATION
• On the exterior of step down landings, install support trim
underneath the sill where it extends past the landing. Position trim
snugly against the bottom of the sill toe.
• Adjust patio door for best operation.
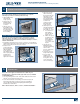
CONTINUOUS AIR SEAL
Create a continuous air seal on the interior between the rough opening
and the door frame with backer rod and sealant or low expansion foam.
Allow the foam to fully cure and cut ush with a sharp knife. Make sure
the foam cuts cleanly and doesn’t tear.
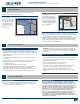
AFTER INSTALLATION
• Install exterior wall
surface (cladding)
per manufactures’
guidelines.
• Seal any gaps or
openings at end of
horizontal mull joints
with sealant.
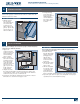
• Leave an expansion/
contraction gap of
approximately 3/8"
between door frame
and nal exterior
wall surface (siding,
stucco, etc.). For a
nished look and
additional protection,
seal this gap on the
sides with backer rod
and sealant. If sealant
is applied above
the drip cap ensure
the sealant bead
is discontinuous to
allow for drainage.
• Protect recently installed units from damage from plaster, paint, etc.
by covering the unit with plastic.
• Remove protective lm (if applicable) on glass within one year and
immediately from cladding.
• Finish all exposed wood surfaces immediately following installation.
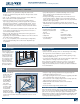
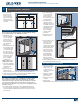
ADJUST LOCK
1. Loosen the lock hook
screws in the side
jamb so it can be
moved up or down.
2. Insert the alignment
guide into one of
the openings in
thefaceplate.
3. Carefully close the
panel and raise
or lower the lock
hook until it aligns
with the slots in the
faceplate. Tighten the screws.
4. To lock the door, rotate the thumb turn 90°.
Note! The thumb turn will not lock when the door is open.
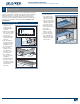
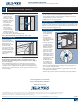
INSTALL EXTERIOR TRIM
For wood exterior
doors not assembled
with brickmould casing,
attach the pre-cut
brickmould 9/16" from
the interior frame
edge to the sides and
head with 2 1/2" casing
nails. Seal brickmould
to frame with silicone
sealant and tool into a
llet joint.
ADJUST SLIDING DOOR PANEL ROLLERS
Note! Adjust the panel high enough to avoid drag. Keep door stile
parallel to the locking jamb by almost closing the door and looking for
an even reveal/gap.
Roller adjustment plugs may be located on the interior bottom face
or end of each operating panel, remove each plug. Using a at head
screwdriver for face adjusted rollers or phillips for end adjusted rollers,
turn the screw counterclockwise to raise the panel or clockwise to lower
it. Reinstall plugs.
Lock
hook
Faceplate
Alignment
guide
Frame
Panel
Brickmould
9/16"
gap
Gap
COMPLETE INSTALLATION - CONTINUED
9
Gap
Backer
rod
Sealant
joint