
Operating Guide


PRODUCT GUIDE
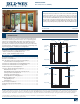
Wood Patio Doors (JPG012)
2
NEEDED TOOLS
Note! Each tool is not required for every task.
• #2 Phillips head,
square drive,
and/or at head
screwdrivers
• Hammer
• Rubber mallet
• Nail set/punch
• Open end wrenches
• Tape measure
• Level
• Utility knife
• Putty knives
• Allen wrenches
• Power drill with bits
• 1" brad nail or small
staple and nail gun
• Chisel
• Gloves
• Pliers/side cutters
• Follow all manufacturers’ instructions and labels.
• Use proper and safe equipment and precautions when cleaning and
servicing the exterior side of patio doors above ground level.
• Insect screens are not security devices and will not prevent a child,
other person, or pet from falling through.
• Use sharp tools with care to avoid damage to wood surfaces.
• Use extra care when driving screws near glass unit to avoid breakage.
• Use caution when tightening screws to avoid stripping the
screwholes.
• Panel removal can be awkward and could cause physical injury or
product damage; we recommend the help of a second person.
HANDING
Entry swinging patio doors (one panel) open from either the left or
the right. Swinging patio doors with two or more panels open in
manycombinations.
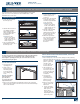
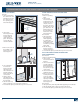
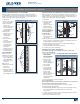
INSECT SCREEN REMOVAL, INSTALLATION AND ADJUSTMENT
SLIDING SCREENS
It may be helpful to
remove insect screen
before other panel(s).
Adjustment screws are
located at each corner
of the door screen and
may be located on
the end of the screen
or on the face. Face
adjustment screws can
either be on top of the
lower rail or accessed
through a hole as shown.
1. Turn all four adjustment screws to retract rollers into the screen.
Note! If door screen has weatherstrip covering adjustment screw,
pull out only enough to expose screw, then press back into place
afteradjustment.
2. Grip both sides of the screen and lift up and over the screen track (if
needed, use putty knife to help lift rollers over track) and remove.
Installation
1. Follow the removal steps in reverse order.
2. Adjust the rollers as explained below.
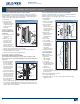
Roller Adjustment
1. Ideal adjustment is as low as possible but just high enough to avoid
drag. Adjustment screws are located at each corner of the door
screen. Turn the adjustment screw in quarter turn increments until
the correct adjustment is achieved. Some rollers will require opposing
rotations to move the roller in the same direction as the other rollers.
• If screen door is ush to side jamb but needs to be raised or
lowered, adjust both bottom rollers the same amount and in the
same direction. Adjust top rollers if needed to apply slight tension.
• If screen top touches side jamb rst, extend the roller closest to the
side jamb, and retract the roller farthest from the side jamb. Make
opposite adjustments if the screen bottom touches side jamb rst.
2. Test operation and readjust as needed.
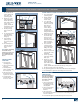
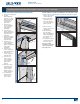
HANGING SCREENS
1. To remove the screen, position the screen on one side and remove
the exposed screws in the screen track in the head. Move the screen
to the other side and remove the remaining screws from the track.
The track will remove with the screen.
2. To install, follow the removal steps in reverse order.
Adjustment
On the bottom, there
is an adjustment screw
hole on the end of the
screen corresponding
with a guide. Adjust the
guides up or down with
a Phillips screwdriver
so that they do not rub
on the sill or come off
thetrack.
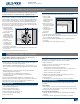
SWINGING SCREENS
Door sweeps should
just contact the sill.
Adjust up or down
by loosening the set
screws at each end of
the panel and moving
the sweep as needed.
Retighten the set
screws when nished.
End Adjusted Roller
Face Adjusted Roller
Adjustment Screw
Locations
Set
screws
Screen
Swinging Screen Shown from End
Sill
Sweep
Adjustment
screw
Guide
Screen
Sill
Stationary
panel
PRECAUTIONS AND SAFETY
NEEDED TOOLS AND MATERIALS
BASIC INFORMATION, SCREEN REMOVAL AND INSTALLATION AND SCREEN ROLLER REMOVAL AND REPLACEMENT
NEEDED MATERIALS
• String
• Tape
• Pencil & paper
• Scissors
• Brad nails
• Shims
• #8 x 5" screws
• Replacement parts
For Hardware Replacement:
• Wooden toothpicks or dowels
• Wood glue
• Wood putty
• Fine sandpaper
• Finishing supplies
• Silicone sealant