
Installation Guide
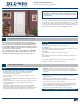

INSTALLATION INSTRUCTIONS
for Interior Pre-Hung Doors (JII109)
3
(07/15)
©2015 JELD-WEN, inc.; This publication and its contents are owned by JELD-WEN, inc. and are protected under the U.S. Copyright Act and other intellectual
property laws. All trademarks, service marks, logos and the like (whether registered or unregistered) are owned or controlled by JELD-WEN, inc. or others.
Unauthorized use or duplication of JELD-WEN intellectual property is prohibited.
JELD-WEN reserves the right to change product specications without notice. Please check our website, jeld-wen.com, for current information.
Please visit jeld-wen.com for warranty
and care and maintenance information.
Thank you for choosing
INSTALL DOOR
3
5. Level the latch side of the jamb in the same manner as the hinge
jamb. Ensure the jamb is not twisted and that the spacing between
the jamb and door is uniform on all sides. Adjust the latch side of the
jamb as necessary.
6. Shim the top of the jamb in the center of the opening and fasten
with a 10d nish nail.
7. Re-check for square, level and even spacing around the door. Nail
securely in place through the stop, jamb, shims and into the studs
every 12"-16". Set nails with a nail punch.
8. Position trim or slide
trim assembly (two
piece jamb) into place
in the frame. Carefully
nail the trim on both
sides of the door every
12" to 16" using 4d
nishing nails.
9. After installation,
replace the center
screw (as shown) in
the top two hinges
(through the leaves
toward the jamb) with
the provided
#9 x 2½" screws.
COMPLETE
INSTALLATION
1. Install lockset hardware per supplied instructions.
2. Fill any nail/screw holes and sand smooth.
3. If installing a two piece jamb system, run a bead of 100%
polyurethane sealant in all joints and tool until smooth.
4. Finish all six sides of the door slab as well as the frame (if not already
done). Note! If removing the slab from the frame for nishing,
remove hinges from the jamb only, do not remove hinges from
theslab.
5. Protect recently installed units from damage from plaster, paint, etc.
by covering the unit with plastic.
Warning! To avoid injury, use at least two people to install. Adequately
support the door until completely fastened.
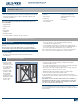
Pre-hung doors will be either a one or two piece jamb system. One
piece jamb doors come without trim applied. Two-piece jamb doors
come in two sections. The inside and outside trim are already applied
to the main frame. The frame section with the pre-hung door is nailed
in place, then the other frame section with the outside trim slides in
from the other side and fits closely to the wall. The two sections are
assembled with a tongue and groove joint which is covered by the
door stop.
One piece jamb systems skip step 1 and begin with step 2.
1. If installing a two
piece jamb system,
separate the trim
assembly from the
frame section. The
trim assembly may
be taped or tacked
to hold it in place
during shipping.
Frame components
can be lightly primed
or stained prior to
installation, but
wait until after
installation before
applying nish coats.
2. Pre-hung door
frames extend
below the slab to
allow for different
oor heights.
The jambs can be
trimmed as needed
before beginning
installation,
however make sure
to leave adequate
space to allow air
to pass under the
door according to
ventilation codes.
3. Remove any
packaging or nails
that hold the
doorclosed.
4. Position the door
unit into the
opening and level
the hinge side of
the jamb. Use shims
fastened through
the jamb and stop
with 10d nish nails
approximately 2"
from the top and 2"
from the bottom of
the jamb to level and
temporarily secure
inplace.
Door
Door
frame
Trim
assembly
Door
stop
Remove
nails
Allowed for
trimming
Jamb
Shim
Two-Piece Jamb System
Jamb
Replace
with
longer
screw