
Installation Guide


INSTALLATION INSTRUCTIONS
for Pre-Hung Exterior Entry Doors (JII106)
7
INSTALL DOOR - CONTINUED
6
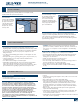
4. If installing a door
with a metal frame
and adjustable
T-Strike, place A over
B and place in the
bore in the frame.
Install screws but do
not tighten. Close
door and push B
inward until the door
slightly compresses
the weatherstrip.
Open door and
tightenscrews.
5. At the sill, pull
the weatherstrip
up slightly and
apply a bead of
sealant (behind the
weatherstrip) at the
intersection of the
jambs, brickmoulds,
thresholds and
oor as shown.
The included foam
wedges are used
to complete the
weatherstrip seal at
each bottom corner
between the jamb
and operating slab(s) when closed. Position the thick edge behind
the weatherstrip, remove the backing paper and adhere to the jamb
asshown.
6. Install drip cap if required or desired. Fold the building wrap
(previously taped up) down over the drip cap and seal the cut ends
with self-adhered ashing or building wrap tape.
7. For metal frames,
apply casing to both
sides. Mark the
locations of the oval
slots in the frame
onto the casing and
secure casing with
fasteners through the
oval slots. For snap
on steel casing, refer
to the instructions
with the clips.
8. Apply sealant around
the outside of the
door unit between
the siding and
brickmould, between
the brickmould
and the jamb
and between the
jamb sides and the
threshold. Apply a
discontinuous bead
of sealant (1/2"
gap every 1') along
the front side of
thethreshold.
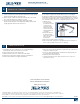
3. From the inside of
doors with sidelites
installed on a wood
oor, pre-drill for #8
screws and ll the
holes with sealant.
Drive two #8x2-1/2"
deck screws through
each door jamb
and sidelite into
the oor in the
locationsshown.
4. Some double door
units may require
installing lock
bolts at the top
and bottom of the
inactive panel. Follow
the instructions
that come with the
product if available.
Otherwise, locate the
center point of each
lock bolt, drill 3/8" bolt holes and install keeper plates.
FINISH INSTALLATION
1. Re-check for smooth door operation and even spacing between the
door and jamb. Secure the strike jamb evenly between the rst two
already in place with two more 10d casing nails (or #8 x 2½" deck
screws) behind the weatherstrip.
Note! Steps 2 and 3 apply only to units with hinge jamb(s) against the
rough opening.
2. Install two provided
#9 x 2-1/2" wood
screws in the top
hinge through the
two holes closest to
the weatherstrip,
driving them through
the hinge jamb and
into the studs. If
necessary, remove
the screws already in
the hinges to insert
these longer screws.
3. If installing a door
with a metal frame,
on the exterior,
slide the “L” shaped
head piece into
the inner section
and center it in the
opening. Install the
jamb pieces making
sure they are tight
against the head
piece and rough
opening. Secure with
fasteners through
the providedholes.
Weatherstrip
Install screws
Fastening for Top Hinge Only
Weatherstrip
Deadbolt
cover plate
A B
Sealant
Wedge
Interior
Box unit shown
Sidelite
frame
Door
frame