
How to Guide

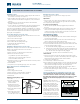
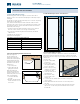


Table Of Contents

3/18
Product Guide
Interior and Exterior Doors (JPG013)
3
HARDWARE REPLACEMENT AND ADJUSTMENT
Hardware Types
• Metal hardware offers functionality, aesthetic appeal and resistance to
corrosion but is not totally corrosion proof.
• Plastic hardware offers high resistance to the elements however, over
time it can deteriorate from ultraviolet light, heat, cold, and chemical
exposure.
• Brass hardware has a special protective lm to reduce/eliminate
polishing and requires special care.
• See our complete Care and Maintenance document at www.jeld-wen.
com for more information on cleaning and lubricating hardware.
Screw hole repair and hardware alignment, or realignment, are common
tasks for any hardware replacement component. Follow these instructions
if screw holes become stripped and/or if hardware no longer functions
properly due to misalignment.
Screw Hole Repair (in wood only)
1. Cut wooden toothpicks or appropriate sized wood dowel to t screw
hole just below wood surface.
2. Fill screw hole with wood glue.
3. Insert toothpicks or dowel and let dry.
4. Fill to surface with wood putty and let dry.
5. Sand smooth and renish and let dry.
6. Drill the new pilot hole.
Hardware Alignment (in wood only)
Misalignment can happen if screws have become stripped and cannot be
tightened. This alignment will create new screw holes.
1. Remove hardware.
2. Repair screw holes according to the procedure above.
3. Mark new screw holes as follows:
• Lay hardware in position and hold in place.
• Mark new screw locations through screw holes.
• Remove hardware and set aside.
4. Drill pilot holes with 1/16" drill bit at new marked screw hole positions
no deeper than screw length.
5. Install hardware.
6. Test operation; if not operating properly, call us for assistance.
Hinge Replacement and Adjustment
Replacement
1. Remove slab.
2. Remove hinge plates from slab.
3. Repair screw holes as instructed above if stripped.
4. Install new hinge plates in the same locations.
5. Reinstall slab.
Adjustment (Spring Hinges Only)
1. Close door.
2. Insert the provided hex
wrench so that it can be
rotated clockwise.
3. Rotate hex wrench 1/4
turn and insert tension pin
loosely into tension hole.
4. Remove hex wrench and try
closing force.
5. Repeat steps until closing
force is adequate but do
not rotate past 3 holes on 180
o
openings or 4 holes on 90
o
openings.
Blinds Between the glass
For easiest operation, keep the slats in a fully open position
whileoperating.
Adjustments
1. If the operator comes off of the track, hold the operator at a sharp
angle to the glass and reinsert the two legs under the track opening.
2. Re-couple the operator magnets.
Re-couple Operator Magnets
1. Slide the operator past the half-way engagement point until the
rstclick.
2. Full travel blinds will fully engage when you hear the rst click. Half
travel (those units with a single side operation) will require you to
continue moving the operator up until you hear the second click. This
will ensure the magnets are fully engaged.
MECHANISM REPLACEMENT
Raise and Lower Mechanism
1. Place a piece of cardboard between the slide mechanism and the glass
to help release the magnets.
2. Tilt the mechanism toward you, and remove the mechanism. It may
require a strong tug to break the magnetic bond.
3. Before replacing the new slide mechanism, ensure the glass is clean.
4. Insert the tabs underneath the lip of the inner frame and raise the slide
to the top until the magnets engage.
a. Full travel blinds will fully engage when you hear the rst click.
b. Half travel (those units with a single side operation) will require you
to continue the travel of the operator up until you hear the second
click. This will ensure the magnets are fully engaged.
5. Check for proper operation. Remove and reinstall if necessary.
Tilt Mechanism
1. Move the top helix to the left side. Moving the slider magnet on the
outside of the glass can do this. The helix tilt operator has a magnet set
which will follow the magnet inside the slide mechanism.
2. Clean the glass attaching area.
3. Peel off the tape on the back of the slider.
4. Before application, push the magnet to the left of the slider. Ensure the
slider is facing the right direction (there is a long horizontal gap at the
top that allows the magnet housing to slide along the base).
5. Let the magnet be attracted to the left side of the magnet, which is
inside the glass. Make sure the slide is horizontal.
6. Push the slide against the glass rmly on the tape area, as the adhesive
works under pressure.
Threshold adjustment (adjustable thresholds only)
Note! Adjusting the threshold may break sealant joints at the
ends and/or interfere with the foam wedges if installed. Adjust
threshold, then replace these components as necessary. See “Foam
Wedges” in the Weatherstrip Replacement section below for
details.
Adjustable thresholds will have
adjustment screw covers or exposed
screws on the top where the
door slab contacts the threshold
when closed. Verify the sweep
properly contacts the threshold
with 1/8" compression as shown.
If adjustment is needed, use a at
head screwdriver to remove screw
covers. Turn all screws clockwise
to adjust up; counterclockwise to
move down until desired height is
achieved and the threshold is level.
Tension
pin
Tension
hole
Clockwise
Threshold
Door panel
Sweep
Threshold