
Installation Guide
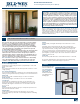
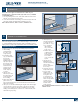

INSTALLATION INSTRUCTIONS
for Pre-Hung Exterior Entry Doors (JII106)
4
• Determine prior to
installation what the
actual nish oor
height will be and
adjust the rough
opening if needed
to accommodate a
taller unit height.
Most doors use a
1-3/8" high threshold
which provides
adequate clearance
in most applications.
This ensures that the
door does not drag
on interior oors
afterinstallation.
• Verify the door is 1" narrower and 3/4" shorter (1/2" each smaller if
code requires) than the rough opening width/height. 90-minute re
doors should be 1-1/4" narrower and 5/8" shorter.
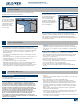
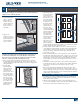
Verify Square, Level and Plumb
A
D
C
E
B
• Verify the rough opening is square. The (A) and (B) measurements
should be the same. Maximum allowable deviation from square
is1/4".
• Verify the rough opening is plumb (C, E and D). The maximum
allowable deviation is 1/8".
• The rough opening sill must not be crowned or sagged (D), but rather
be level or sloped (positive slope) to the exterior.
• The exterior face of the rough opening must be in a single plane (E)
with less than 1/8" twist from corner to corner.
• Minimum double studs should be used at all wood framed
roughopenings.
• The header must be supported by trimmer studs.
FOR RETROFIT INSTALLATIONS
After removing the old door, remove sufcient cladding (siding, stucco,
etc.) to expose enough intact building wrap to properly seal the door
system to the opening. If damaged, apply new building wrap in shiplap
manner. Verify the rough opening framing is structurally sound. Contact
your local waste management entities for proper disposal or recycling
of products being removed.
INSPECT ROUGH OPENING
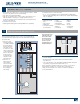
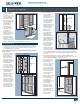
2
6. For continuous
slab, cut across the
foldingline.
7. Fold the three back
sides up to make a
3-sided box, and, for
step-down landings,
fold the front
apdown.
INSTALL SILL PAN
1. Set the sill pan in
the rough opening,
aligning the front
edge (for continuous
slab) or folded down
edge (for step-down)
with the exterior of
the rough opening.
2. Mark a line across
the front and back of
the sill pan.
3. Apply three 3/8"
beads of sealant
between the lines.
4. Place the sill pan in
the rough opening.
Firmly press the sill
pan into the sealant
with a J-roller.
The sill can be prepared using one of two methods: We recommend
SureSill
™
Sloped Sill Pan
™
available from SureSill at www.suresill.com,
building supply stores, and some manufacturing locations. As an
alternative, a sill pan can be fabricated on site, by following the
instructions below. If installing a SureSill
™
sill pan, follow SureSill’s
instructions for installation and skip to section 5 “PREPARE
STUD-FRAMED WALL“.
JOBSITE FABRICATED SILL PAN
1. Cut a piece of sheet
material to the
length shown.
2. Lightly crease folding
lines 1/2" in from the
two short sides and
one long side.
3. Measure the distance
from the back of the
trim to the interior
edge of the sill and
add 9/16".
4. Take this distance
from the back edge
and lightly crease a
folding line across
the sheet material.
5. For step-down
landings, cut 1/2"
in at this line on
both sides of the
sheetmaterial.
Sealant
INSTALL SILL PAN
3
Measure
frame
width
Interior
Continuous slab
Step-down
Fold sides and back up
Fold corner
forward
Fold front
ap down
½" ½"
½" ½"
Sill width
+ 9/16"
Length of rough opening sill plus 1"
Folding line