
Installation Guide


InstallatIon InstructIons
for Vinyl Patio Doors without Nailing Fin (JII015)
6
ALL INSTALLATIONS
1. If installing a
pre-formed sill
pan, follow
manufacturer's
instructions and skip
this step. If installing
a job site fabricated
sill pan, run a
continuous 3/8" bead
of sealant along the
sill pan back dam.
When the frame is
installed, make sure
the frame makes
solid contact with the
sealant. Add more
sealant if necessary.
2. Tilt the frame into the rough opening. Adequately support the frame
until fully installed.
3. Align the exterior of the frame, or ush n, with the most exterior
surface of the structure (the exterior face of the concrete wall,
framing or sheathing).
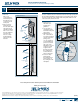
SHIM THE JAMBS
Note! Secure all shims
with sealant.
3. From the interior,
shim the head and
side jambs 4" from
the corners and at
the strike plate so
that strike plate
screws (installed
later) will each
penetrate a shim.
Shim so the door is
square, level and
plumb.
6
INSTALL PATIO DOOR
Warning! To avoid injury, use at least two people to install. Adequately
support the door until fully installed.
IF INSTALLING A FLUSH FIN PATIO DOOR
If installing a door with
a ush n, apply at
least one continuous
3/8" bead of sealant to
the exterior face of the
jambs and head.
Continue with the
instructions.
Sealant
Patio doors will be fastened according to Performance Grade (PG)
rating. This rating is located on the gold AAMA label xed somewhere
on the frame. Look for something like this example: R-PG20-3645X2426
(144X96)-SD. Mark fastener locations in the interior frame track of the
side jambs and head as follows:
•PG20--4" from each corner and every 24".
•PG35--4" from each corner and every 18".
•PG50 and above--4" from each corner and every 12".
4. At each fastener
location, insert shims
and only through
the rst wall of the
jamb, drill a 3/8"
clearance hole. Then,
drill a 1/8" pilot hole
through the jamb
wall, shim and into
the framing.
5. Drive a washer or
pan head screw
through the shim
located 4" from one
lower corner.
6. Conrm the patio
door is square, level, and plumb. Test for proper operation (remove
and reinstall if necessary).
SECURE PATIO DOOR
Note! Do not over tighten fasteners and do not allow fasteners to
deform the vinyl frame, it must be kept at and straight.
1. At each remaining corner, fasten patio door through shims in the
same manner above.
2. Drive screws through each of the remaining fastener locations.
Exterior
Framing
Screw
3/8"
Clearance Hole
Jamb
Opposing
shims
Sealant
4"
4"
4"
Strike
plate