
Installation Guide


INSTALLATION INSTRUCTIONS
for Vinyl Patio Doors with Integral Nailing Fin (JII006)
3
•Verify the width and
height of the patio
door are each 1/2"-
3/4" smaller than
the rough opening
width/height.
Mulled units should
be 3/4" smaller.
•Verify the rough
opening is square.
The (A) and (B)
measurements
should be the same.
Maximum allowable
deviation from
square is 1/4".
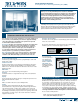
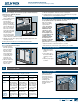
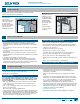
2
INSPECT ROUGH OPENING
A
B
D
C
E
Verify Square, Level, and Plumb
•Verify the rough opening is level and plumb (C). The maximum
allowable deviation is 1/8".
•The rough opening sill must not be crowned or sagged (D).
•The exterior face of the rough opening must be in a single plane (E)
with less than 1/8" twist from corner to corner.
•Minimum double studs should be used at all wood framed rough
openings.
•The header must be supported by trimmer studs.
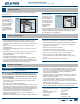
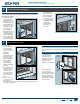
REMOVE PACKAGING
Remove shipping materials such as corner covers, shipping blocks or pads.
INSPECT PATIO DOOR
•Cosmetic damage
•Product squareness (diagonal measurements must be within
1/4" difference).
•Correct product (size, color, grid pattern, handing, glazing, energy-
efciency requirements, etc.).
1
REMOVE PACKAGING AND INSPECT PATIO DOOR
•Splits, cracks, holes, missing sections or other damage to the nailing
n longer than 6" and/or within 1/2" of patio door frame.
•For side-by-side mulled units only, a drip cap may be pre-installed. If
not pre-installed, see Needed Materials list above for details.
•Included parts (See Provided Materials above)
If any of the above conditions represent a concern, or if you expect
environmental conditions to exceed the patio door's performance
rating, do not install the patio door. Contact your dealer or distributor
for recommendations.
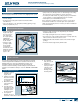
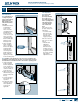
The sill can be prepared using one of two methods: We recommend
SureSill™ Sloped Sill Pan™ available from SureSill at www.suresill.com,
building supply stores, and some manufacturing locations. As an
alternative, a sill pan can be fabricated on site, by following the
instructions below. If installing a SureSill™ sill pan, follow SureSill™'s
instructions for installation and skip to section 4 “PREPARE STUD-FRAMED
WALL“.
JOBSITE FABRICATED SILL PAN
1. Cut a piece of sheet
material to the
length shown.
2. Lightly crease folding
lines 1/2" in from the
two short sides and
one long side.
3. Measure the width
of the frame and
add 9/16".
4. Take this distance
from the back edge
and lightly crease a
folding line across
the sheet material.
5. For step-down
landings, cut 1/2" in
at this line on both sides of the sheet material.
6. For continuous
slab, cut across the
folding line.
7. Fold the three back
sides up to make a
3-sided box, and,
for step-down
landings, fold the
front ap down.
INSTALL SILL PAN
3
Frame
width
+9/16"
Folding Line
Length of rough opening sill plus 1"
1/2"
1/2"
Fold sides and back up
Fold corner
forward
Fold front
ap down
Remove for
continuous slab
Measure
frame
width
Interior