
Operating Guide

PRODUCT GUIDE
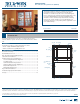
Wood Double-Hung Windows (JPG010)
SASH REMOVAL & INSTALLATION
NEW (REPLACEMENT) SASH INSPECTION & PREPARATION
1. Inspect sash for proper size and type, and for any damage; do not
install if damaged.
2. Paint and/or nish new sash upon delivery and let dry completely
before installing hardware.
3FNPWFIBSEXBSFMPDLLFFQFSBOEIBOEMFGSPNPMETBTIBOE
transfer to new sash.
Very Important! All hardware must be installed on new sash in exact
positions as on the old sash. If necessary, measure and mark all
hardware positions on new sash. Reuse existing screws or replace with
an exact replacement. Incorrect screws can cause damage.
4. Determine hardware locations on new sash; pay close attention to
lock and keeper alignment position.
1SFESJMMTDSFXIPMFTGPSIBSEXBSFXJUIESJMMCJU
*OTUBMMIBSEXBSFQSFWJPVTMZSFNPWFEGSPNPMETBTIPOUPOFXTBTI
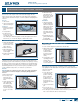
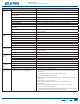
SASH TYPES
A non-compression tilt
sash has thumb latches
(sash retainer latches)
on the top two corners
of the sash.
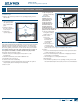
A compression tilt sash
does not have thumb
latches, but is removed
by depressing the
KBNCMJOFSBOEQVMMJOH
out the sash in a
simultaneous motion.
The EPIC
®
series
Double-Hung has
a compression
tilt sash and sash
retainer latches.
The sash is released
GSPNUIFKBNCMJOFS
by loosening and
releasing the sash
retainer latches then
pressing against the
KBNCMJOFSBOEQVMMJOH
out the sash at the
same time.
OPERATING SASH REMOVAL & INSTALLATION
Double-hung windows require the lower sash be removed before the
upper sash and the upper sash installed before the lower sash. Label top
and bottom sash for reinstallation. The lock is on the bottom sash.
REMOVAL
1. Open sash at least half way.
2. For windows with retainer latches, slide both latches toward the
center and tilt sash down.
'PSXJOEPXTXJUIPVUMBUDIFTVTJOHCPUIIBOETTJNVMUBOFPVTMZHSJQ
CPUIFOETPGTBTIUPQBOEQSFTTBHBJOTUKBNCMJOFSTBOEUJMUTBTI
down.
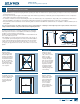
4. For Epic series:
a. Remove screen
and receiver if
applicable.
b. Remove single
screws from both
retainer latches
and loosen end
screws.
c. Slide retainer
latches toward
center to release
sash.
d. Using both hands,
TJNVMUBOFPVTMZHSJQCPUIFOETPGTBTIUPQBOEQSFTTBHBJOTUKBNC
liners and tilt sash
down.
Note! To keep tilt pin
from releasing and
popping up, keep sash
level while tilting.
5JMUTBTI¡
8JUIUIFTBTIUJMUFE
BU¡MJGUPOFDPSOFS
to disengage tilt pin
from terminal block;
SFNPWFGSPNKBNC
liner.
7. Slightly swing
sash out while
disengaging opposite
tilt pin from balance
system and remove.
*GSFNPWJOHUIF
upper sash on
a double-hung
window, remove
screen before the
sash. To remove
half-screens, unscrew
and remove screen
receiver.
Note! Carefully identify
and label both sashes
for later installation.
The lower sash check
rail has the lock, and
the upper sash check
rail has the keeper.
Side Load Windows
(manufactured before
1983)
1. Open the sash at
least half way.
2. Pull top of balance
straight out of side
KBNCUVSO¡BOE
rest pin on top of
sash.
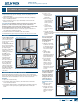
Non-Compression Tilt
EPIC Series
Thumb
latch
Screen
receiver
Screen
receiver
Balance
Balance
Sash
Pin
Retainer
latch