
Operating Guide
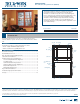

PRODUCT GUIDE
Wood Double-Hung Windows (JPG010)
4
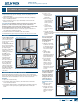
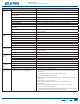
SASH REMOVAL & INSTALLATION - CONTINUED
SIDE LOAD WINDOWS - CONTINUED
1SFTTTBTIUJHIUBHBJOTUPOFTJEFKBNCSFMFBTFPQQPTJUFTJEFBOE
remove sash.
4. For new sash, refer to “New Sash Preparation” earlier in this section.
'PMMPXUIFTFTUFQTJOSFWFSTFGPSJOTUBMMBUJPO
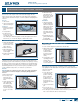
INSTALLATION
*OTUBMMVQQFSTBTIåSTUJOFYUFSJPSKBNCMJOFSDIBOOFMBOEMPXFSTBTI
TFDPOEJOJOUFSJPSKBNCMJOFSDIBOOFM
2. Hold sash (exterior side up) horizontal and perpendicular to window
frame.
4MJHIUMZUJMUTBTIJOTFSUUJMUQJOPGPOFDPSOFSPGTBTIJOUPKBNCMJOFS
KVTUBCPWFDMVUDI3FQFBUGPSPQQPTJUFTJEFBOEMFWFMTBTI
Note! To ensure proper operation and to prevent damage to the
balance system, make sure tilt pins are completely and properly
engaged on both sides before tilting sash back into place.
4. Tilt sash up into place.
&OHBHFSFUBJOFSMBUDIFTJGBQQMJDBCMF
5FTUPQFSBUJPOPGTBTICZPQFOJOHBOEDMPTJOH
Note! If sash does not move freely in window frame, tilt pins may not
be engaged properly. Remove and reinstall, taking care to engage tilt
pins on both sides.
7. If applicable, reinstall screen receiver and screen.
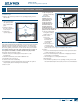
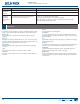
HARDWARE REPLACEMENT & ADJUSTMENT
Note! Hardware styles have changed over the years and may vary
slightly from the illustrations in this document.
HARDWARE TYPES
Metal hardware offers functionality, aesthetic appeal and resistance t
to corrosion but is not totally corrosion proof. Replace any hardware
if it becomes corroded.
Plastic hardware offers high resistance to the elements however, over t
time it can deteriorate from ultraviolet light, heat, cold, and chemical
exposure.
Brass hardware has a special protective lm to reduce/eliminate t
polishing and requires special care.
5IF#BMBODF4ZTUFNJTMPDBUFEJOUIFKBNCMJOFSTJOUIFTJEFKBNCTt
and needs regular inspection. If the sash is not moving up and down
smoothly, the balance system may need to be replaced.
Screw hole repair and hardware alignment, or realignment, are
common tasks for any hardware replacement component. Follow these
instructions if screw holes become stripped and/or if hardware no
longer functions properly due to misalignment.
SCREW HOLE REPAIR
1. Cut wooden toothpicks or appropriate sized wood dowel to t screw
IPMFKVTUCFMPXXPPETVSGBDF
2. Fill screw hole with wood glue.
*OTFSUUPPUIQJDLTPSEPXFMMFUESZ
4. Fill to surface with wood putty; let dry.
4BOETNPPUIBOESFåOJTIMFUESZ
%SJMMOFXQJMPUIPMF
HARDWARE ALIGNMENT
Misalignment can happen if screws have become stripped and cannot
be tightened. This alignment will create new screw holes.
1. Remove hardware.
2. Repair screw holes according to the procedure above.
.BSLOFXTDSFXIPMFTBTGPMMPXT
Lay hardware in position and hold in place.t
If replacing a lock, turn latch to lock position to engage keeper.t
Mark new screw locations through screw holes.t
Remove hardware and set aside.t
%SJMMQJMPUIPMFTXJUIESJMMCJUBUOFXNBSLFETDSFXIPMF
positions no deeper than screw length.
*OTUBMMIBSEXBSF
5FTUPQFSBUJPOJGOPUPQFSBUJOHQSPQFSMZDBMMVTGPSBTTJTUBODF
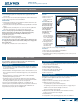
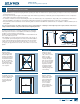
STATIONARY SINGLE-HUNG UPPER SASH (INCLUDING RADIUS SINGLE-HUNG)
Removal
1. Remove lower sash.
2. Remove insect
screen and screen
receiver.
Note! Hold the sash
securely for the next
steps. Once the sash
block (or head stop)
is removed, the upper
sash may fall over
if not supported.
Save all screws for
reinstallation.
6OTDSFXBOE
remove sash blocks
GSPNUIFTJEFKBNCT
or for radius single
hung, remove head
stop and brackets.
4. Hold upper sash to
keep it from falling
over. Slide down
about half way.
'PMMPXTUFQTGPS0QFSBUJOH4BTI3FNPWBM
Installation
'PMMPXTUFQTGPS0QFSBUJOH4BTI*OTUBMMBUJPO
2. Close sash and reinstall sash blocks.
3FJOTUBMMCSBDLFUTIFBETUPQBTBQQMJDBCMFTDSFFOSFDFJWFSTDSFFO
and lower sash.
Block