
Operating Guide

PRODUCT GUIDE
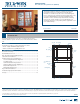
Wood Double-Hung Windows (JPG010)
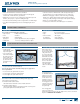
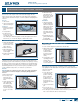
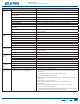
LOCK REPLACEMENT
The lock sits on the top rail of the lower sash and engages into the
lock keeper (located on the bottom rail of the upper sash). Operating
sashes must be unlocked and open, or removed, before attempting lock
removal.
Removal
1. Unlock sash.
2. Unscrew and remove
old lock and keeper.
Installation
1. Install new lock and
keeper in the same
place.
2. Test operation.
*GPMEMPDLBOE
keeper were aligned
correctly, the new
lock and keeper should be aligned correctly through the same screw
holes. If not, see “Screw Hole Repair,” earlier in this section.
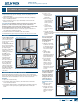
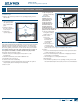
SASH LIFT INSTALLATION/REPLACEMENT
1. Align sash lift handle
at center of interior
CPUUPNSBJMGBDF
above sill stop.
2. Mark screw holes.
%SJMMNBSLFEQJMPU
holes no deeper than
screw length.
4. Position sash lift and
drive screws.
Lock
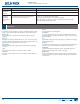
HARDWARE REPLACEMENT & ADJUSTMENT - CONTINUED
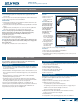
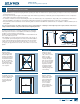
JAMB LINER REPLACEMENT & ADJUSTMENT
+BNCMJOFSTBSFWJOZMDPNQPOFOUTMPDBUFEJOUIFTJEFKBNCTUIBUIPVTF
the balance system of the window. If your sash is not opening or closing
QSPQFSMZZPVNBZOFFEUPSFQMBDFUIFKBNCMJOFS$PODFBMFEKBNCMJOFST
are typically not user serviceable. Please contact us for options. For help
EFUFSNJOJOHXIFUIFSPSOPUZPVOFFEUPSFQMBDFZPVSKBNCMJOFSSFGFS
to the Troubleshooting Section, or contact us or your dealer.
Removal
Warning! Remove sash from at least 8" above sill to make sure balance
system tension is released enough to avoid injury during jamb liner
removal.
1. Remove both sashes.
2. If necessary, score
head stop, then
remove with putty
knife.
(FOUMZQSZUIFMPXFS
FOEPGUIFKBNC
liner with a putty
knife starting at
the bottom of the
exterior edge until
it comes out of the
track.
4. With both hands,
HSJQKBNCMJOFSBU
the bottom on both
sides; squeeze and
pull upward to
remove.
Installation
1. Using both hands,
QPTJUJPOKBNCMJOFS
ýVTIUPIFBEKBNC
Firmly press exterior
side (interior for
premium windows)
PGKBNCMJOFSJOUP
TJEFKBNCUIFOåU
into remaining side
KBNC
2. Reinstall head stop
gently with hammer
(if applicable).
3FJOTUBMMCPUITBTIFT
ADJUST JAMB LINER TENSION (IF APPLICABLE).
1. Remove sashes.
-PDBUFUFOTJPOBEKVTUFSTJOKBNCMJOFSTPOCPUITJEFT
"EKVTUXJUIBO"MMFO
wrench; clockwise
to add tension,
counterclockwise
to release tension.
"EKVTUFBDITJEF
evenly.
4. Test operation. If not
operating properly,
reinstall. If not
successful, call us for
recommendations.
PIVOT/TILT PIN REPLACEMENT
Depending on the specic type of window you have, pin styles may
vary slightly from the illustrations. These pins are located at the bottom
corners of each sash.
1. Remove sash.
2. Locate pins at sash
corners. Note the
position of the pin
before removing
it. Operational
problems may occur
if new pin is not
installed in the same
position.
6OTDSFXBOESFNPWF
pin.
4. For Torx pin, use a
Torx socket wrench or vise grips, unscrew and remove.
'PSPMEFSQJOTMPDBUFOBJMBOEPSTDSFXBOESFNPWFTPNFWFSTJPOT
have a screw and some have a nail and screw).
Lock
Lower
sash
Keeper