
Installation Guide


Needed Materials
Note! JELD-WEN exterior window and door products should be
installed in accordance with JELD-WEN’s recommended installation
and ashing directions, which are shipped with the products or can
be found on our website: www.jeld-wen.com. Note that alternative
installation methods and ashing systems may be utilized at
the installer’s or owner’s discretion and, in such situations the
installation should be done in accordance with the ashing
manufacturer’s instructions. Follow all material manufacturer’s
instructions for proper use and compatibility. When using flashing,
spray adhesive/primer, sealant and foam products, we recommend
using the same manufacturer and verifying compatibility. It is the
End User’s responsibility to determine if dissimilar materials are
compatible to the substrates in the application.
Note: On Siteline Impact casement and awning windows, fasten through
the provided clip and nail n with (1) #8 x 1-1/2" screw that penetrates
into the structural member.
• 1-3/4" galvanized roong nails (nailing n windows). Nails must
penetrate at least 1-1/4" into framing (or as required by local code).
• #8 x 1-1/2" corrosion-resistant, pan head screws. Screws must
penetrate at least 1" into framing (or as required by local code).
• Galvanized drip cap (or factory supplied).
• Sealant: We recommend OSI
®
QUAD
®
Max Sealant or equivalent. This
can be used in any application and can be painted or ordered in a color
matched product, if desired.
• Backer rod 1/8" larger than the widest portion of the gap (used in
conjunction with sealant bead).
• Polyurethane low expansion Window and Door foam: We recommend
OSI
®
QUAD
®
Foam or equivalent.
• Non-compressible or non-water degradable shims.
For mulled units on the sill:
• Masonry clips.
• #8 x 1/2" screws for fastening masonry clips to the window.
• #8 screws for attaching masonry clips to structure. Screws must
penetrate at least 1" into framing.
For installations into a stud-framed wall:
• 4", 6", or 9" (as required by local code and window conguration)
wide self-adhered ashing: We recommend OSI
®
Butyl Flash Tape
orequivalent.
• Spray adhesive/primer for self-adhered ashing. Such as Loctite
®
300 or
equivalent. Follow manufacturer’s instructions for applicationmethods.
For installations into a buck:
• Liquid applied ashing (Protecto Wrap LWM 200 or equivalent).
Needed Tools
• Utility knife
• J-roller
• Hammer
• Tape measure
• Caulking gun
• Level (4' minimum recommended)
• Drill with 1/8" tapered bit
and3/8" countersink
• Screwdrivers
• Finish hammer or pneumatic nish
nail gun
• Carpenter’s glue
• Pencil
• Nail set
• Miter saw
MATERIALS AND TOOLS
REMOVE PACKAGING AND INSPECT WINDOW
1
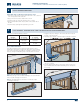
Remove Packaging
Remove shipping materials such as corner covers, shipping blocks or pads.
If there is a protective lm on the glass, do not remove it until installation
and construction are complete. Cut off any staple legs exposed on the side
of theframe.
Note! Double-hung windows may have banding on the interior of the
unit. Do not remove until the window is secured in the opening to help
keep the sash in place and the unit square.
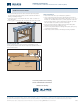
Inspect Window
• Cosmetic damage.
• Product squareness (diagonal measurements not more than
1/4"different).
• Correct product (size, color, grid pattern, handing, glazing,
energy-efciency requirements, etc.).
• Drip cap that extends the length of the exterior trim plus 1/8" overhang
on each end (all units require a drip cap); drip cap may or may not be
pre-installed.
• Splits, cracks, holes, missing sections or other damage to the nailing n
longer than 6" and/or within 1/2" of window frame.
• If any of the above conditions represent a concern, or if you expect
environmental conditions to exceed the window’s performance
rating, do not install the window. Contact your dealer or distributor
forrecommendations.
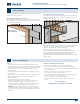
Installation Instructions
for Wood/Clad Wood Windows with Exterior Trim or Nail Fin (JII024)
3