
Installation Guide


FLASH WINDOW - WINDOWS WITH A NAIL FIN INSTALLED INTO STUD-FRAMING ONLY
7
Cut pieces of self-adhered ashing as follows:
MIN. SIZES OR OTHER
SPECIFIED
PG50 or below
(4" flashing)
Above PG50
(6" flashing)
One header piece 10" longer than
theheader
14" longer than
theheader
Two side pieces 8" longer than
thejamb
12" longer than
thejamb
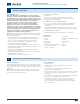
Spray Adhesive/Primer
Spray adhesive/primer may be required in certain situations, refer to
manufacturer’s instructions for appropriate applications. Protect window
from overspray and apply spray adhesive according to instructions on the
product to nailing n and building wrap around the window as shown.
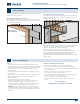
Apply the Self-Adhered Flashing
Note! Keep the edge of the self-adhered flashing as close to the window
frame as possible and apply over the nail fin.
Note! The following dimensions are based on 4" wide tape, adjust
accordingly for wider tape.
1. Apply the side pieces starting 3" above the header and overlap the
ashing on the sill as shown.
2. Install drip cap if required. Pre-drill through the nailing n if required.
3. Center and apply the header piece above the header, overlapping the
side pieces as shown.
4. Press the ashing down with a J-roller, being careful to remove any
gaps or bubbles beneath self-adhered ashing (remove and replace
ifnecessary).
3"
1"
1"
Flashing
3"
3"
INSTALL WINDOW CONTINUED
6
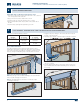
Apply Drip Cap to Windows with Exterior Trim
1. Cut a piece of drip cap the length of the header trim + 1/4" to allow for
1/8" overlap past the ends of the trim.
2. Apply 1/4" bead of sealant to header trim as shown.
3. Center the drip cap on the trim and nail in place asshown.
4. Apply sealant underneath the drip cap where it meets both ends of
thetrim.
5. Fasten the drip cap through the upturned leg as shown.
Installation Instructions
for Wood/Clad Wood Windows with Exterior Trim or Nail Fin (JII024)
8