
Operating Guide
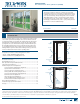


PRODUCT GUIDE
Wood Casement & Awning Windows (JPG009)
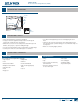
Scissor Arm Operator
Guide Bar Operator
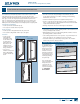
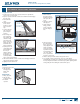
4. Disengage hinges
from both sides as
follows:
'JSNMZHSJQTBTI
and pry hinge arm
from stud on frame
with at blade
screwdriver on both
sides.
4MJEFTBTIEPXOUP
disengage hinge
slides from hinge
tracks and remove.
INSTALLATION
1. Firmly grip sash.
2. Engage hinge slides
into both sides at
the same time.
4MJEFTBTIVQXBSE
toward the top.
4. Reattach hinge arms to hinge studs.
1PTJUJPOPQFSBUPSQBSUJBMMZPQFO
"UUBDIPQFSBUPSBSNUPIPPLTPSTIPFTUVETFOHBHFSFUBJOFSDMJQT
and close keeper locks (if applicable).
7. Test for proper operator attachment by cranking the operator open
and closed.
3FQMBDFUIFJOTFDUTDSFFOJGQSFTFOUBOEWFSJGZUIFMPDLPQFSBUFT
properly.
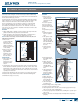
AWNING SASH
REMOVAL
1. Remove insect
screen if present
and unlock and
open sash at least
half way.
For scissor operator
arms: open keeper
lock(s) and then lift
operator arms off sash
hooks.
For guide bar operator
arms:
1. Pull back retainer
clips on operator
arms.
2. Lift operator arms
from shoe studs.
The shoes are not
xed to the guide
bar and will fall out
if the sash tilts to
the side.
$SBOLPQFSBUPS
arms to closed
position.
STATIONARY CASEMENT SASH
Stationary sashes changed over time and may be fastened differently
depending on window model. Please contact us for more information if
unsure about which type you have.
A stationary sash does not have operating hardware and is xed in the
frame with screws or screws and brackets. These brackets attach to the
frame and sash on the interior and are hidden by the sash stops.
5IFSFBSFVTVBMMZUXPPSNPSFGBTUFOFSMPDBUJPOTPOFBDITJEFKBNC
and on the sill holding the sash in place. Depending on the size of
UIFXJOEPXUIFGBTUFOFSMPDBUJPOTBSFGSPNUIFDPSOFSTBOE
TQBDFEFWFSZJOCFUXFFO*OTUBMMUIFOFXGBTUFOFSTJOUIFTBNF
locations as the old ones.
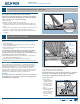
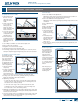
REMOVAL
1. With a utility knife, carefully score the interior sash stops at the side
KBNCTBOETJMMXIFSFUIFZNFFUUIFTBTIBOEGSBNF
2. Gently pry up the sash stops with a putty knife or small pry bar to
expose the brackets. Be careful not to damage the wood.
Note! For these next steps, once the brackets are removed, the sash
will fall if not supported.
3FNPWFUIF
screws holding the
brackets to the
sash from the side
KBNCTBOETJMMUIF
brackets may be left
on the frame).
4. Remove the sash.
If stuck, gently
tap around the
perimeter of the
sash to remove it
from the frame.
INSTALLATION
1. Follow new sash
preparation
instructions at the
beginning of this
section.
2. Carefully place the new sash in the frame. If the old sash had setting
blocks attached around the perimeter of the sash, remove these and
install them on the replacement sash. If no setting blocks are present,
take a pry bar and lift up on the bottom of the sash to center it in the
opening as it is fastened.
3FBUUBDIUIFCSBDLFUTJOUIFTBNFMPDBUJPOTBTPOUIFQSFWJPVTTBTI
4. Reattach the stops and nail to the frame with new nishing nails.
3FåOJTIUIFTUPQTBTOFDFTTBSZ
SASH REMOVAL & INSTALLATION - CONTINUED
Frame stud
Hinge slide
Sash
Hinge
track
Jamb
Hinge
arm
Sash hook
Operator
arm
Sash
Sash stop
4JEFKBNC
Bracket
Head
KBNC