
Operating Guide
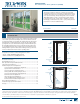


PRODUCT GUIDE
Wood Casement & Awning Windows (JPG009)
7
HARDWARE REPLACEMENT & ADJUSTMENT
SCREW HOLE REPAIR
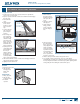
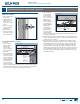
1. Cut wooden toothpicks or appropriate sized wood dowel to t screw
IPMFKVTUCFMPXXPPETVSGBDF
2. Fill screw hole with wood glue.
*OTFSUUPPUIQJDLTPSEPXFMMFUESZ
'JMMUPTVSGBDFXJUIXPPEQVUUZMFUESZ
4BOETNPPUIBOESFåOJTIMFUESZ
%SJMMOFXQJMPUIPMF
HARDWARE ALIGNMENT
Misalignment can happen if screws have become stripped and cannot
be tightened. This alignment will create new screw holes.
1. Remove hardware.
2. Repair screw holes according to the procedure above.
.BSLOFXTDSFXIPMFTBTGPMMPXT
Lay hardware in position and hold in place.t
If replacing a lock, turn latch to lock position to engage keeper.t
Mark new screw locations through screw holes.t
Remove hardware and set aside.t
%SJMMQJMPUIPMFTXJUIESJMMCJUBUOFXNBSLFETDSFXIPMF
positions no deeper than screw length.
*OTUBMMIBSEXBSF
5FTUPQFSBUJPOJGOPUPQFSBUJOHQSPQFSMZDBMMVTGPSBTTJTUBODF
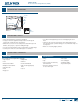
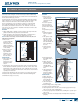
OPERATOR REPLACEMENT - REMOVE HANDLE
Not all operators are removable. Call us for recommendations. A lever
operator handle is not removable. If you have a lever operator, remove
TDSFFOPQFOXJOEPX¡UIFOCFHJOXJUIiREMOVE OPERATOR.”
1. Remove insect screen
(if present).
2. Open the window
half way.
If there is a small t
set screw on the
side of the handle,
use a small at
head screwdriver to
loosen it to allow
removal of the
handle.
If there is no set t
screw, the handle is attached with a spring clip and can be removed
simply by pulling it off with a slight tug.
3FNPWFUIFIBOEMF
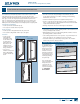
OPERATOR REPLACEMENT
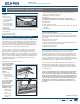
REMOVAL
1. Carefully score along
bottom and side
edges of wood sill
cover.
2. Some wood sill
covers are secured
with screws. If screws
are present remove
them.
Note! To avoid damage,
place a cloth between
the wood and the
prying tool.
0OFYUFSJPSTJEF
carefully pry the
wood sill cover up
and away from sill
with large putty
knife or claw portion
of a hammer.
4. Remove ller blocks
(if present) from
underneath the sill
cover and note their exact location for reinstallation.
%FUBDIPQFSBUPSBSNT'PMMPXUIFTUFQTJOUIF4BTI3FNPWBMBOE
Installation section).
3FNPWFUIFTDSFXTPSOBJMTIPMEJOHUIFPQFSBUPSUPUIFTJMM
7. Remove the operator to the interior.
INSTALLATION
1. Install new operator in same location as the old operator. If securing
with screws, do not over-tighten.
2. Reattach operator arm(s).
3FQMBDFIBOEMFBOEDIFDLXJOEPXPQFSBUJPOJGXJOEPXPQFSBUFT
QSPQFSMZQSPDFFEXJUIGPMMPXJOHTUFQTJGOPUSFNPWFBOESFJOTUBMM
operator.
4. Replace ller blocks to exact locations if previously removed.
3FQMBDFXPPETJMMDPWFSUPPSJHJOBMQPTJUJPO4FDVSFJOUPQMBDFXJUI
original screws or brad nails.
5PVDIVQXJUIQBJOUPSåOJTIBTOFDFTTBSZBOEBMMPXUPESZ
thoroughly.
7. Replace removable plastic operator cover if present.
3FQMBDFTDSFFO
9. Reattach operator handle and verify operation.
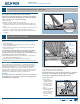
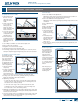
CASEMENT OPERATOR TRACK REPLACEMENT
REMOVAL
1. Open sash at least
half way.
2. Detach long operator
arm.
-PDBUFBOESFNPWF
screws from track
and remove.
INSTALLATION
1. Align operator track
to existing screw
IPMFTSFQMBDFBOE
tighten screws.
2. Reattach long
operator arm.
$MPTFBOEPQFOXJOEPXUPDIFDLPQFSBUJPO
Set screw
Sill
cover
Sill
cover
Score
here
Operator
handle
Operator
attachment
screw
Operator
track
Arrow
Long operator
arm