
Operating Guide


PRODUCT GUIDE
Wood Casement & Awning Windows (JPG009)
HARDWARE REPLACEMENT & ADJUSTMENT - CONTINUED
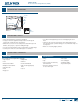
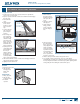
AWNING GUIDE BAR REPLACEMENT (IF APPLICABLE)
REMOVAL
1. Remove sash.
2. Detach operator
arms as described
in sash removal and
installation.
-PDBUFBOESFNPWF
screws from guide
bar with screwdriver
and remove.
INSTALLATION
"MJHOHVJEFCBSUPFYJTUJOHTDSFXIPMFTSFQMBDFBOEUJHIUFOTDSFXT
2. Reinstall sash.
3FBUUBDIPQFSBUPSBSNT
4. Check window operation.
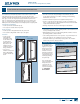
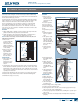
HINGE REPLACEMENT - STANDARD CASEMENT & AWNING
There are three types of hinges available for casement windows: a
standard casement hinge, an egress casement hinge or a butt hinge. An
egress hinge allows a casement window to open wide enough to meet
emergency exit requirements. Casements with this type of hinge have
slots on the hinge arm (unlike regular hinges) and, when open, have
little space between the hinged side of the sash and the window frame.
When ordering a new hinge, specify egress if needed.
Casement hinges are located at the top and bottom of the sash and
allow the window to open and close. Handing is determined by the
hinge location as viewed from the exterior. Hinges are either left or
right-handed. If a window has left-handed operation, the bottom hinge
will be a left-handed hinge, and the top hinge will be a right-handed
hinge. For a window with a butt hinge, a left-handed window will have
a left-handed egress hinge and a right-handed window will have a
right-handed butt hinge.
Awning hinges are located on each side.
Note! Before beginning
replacement, compare
replacement hinge
to the existing hinge
to make sure it is
the correct type and
handing.
1. Remove sash.
2. Remove old hinge:
Fold operator/t
hinge arm(s) out of
the way.
Note! Some windows
do not have a hinge
track. Instead, the
hinge is secured
directly to the sill and
head and uses the
cladding as a track.
Unscrew and t
remove hinge
track.
Unscrew and t
remove hinge
assembly.
*OTUBMMUIFIJOHFUSBDLBOEUIFOFXIJOHFBTTFNCMZ%POPUPWFS
tighten screws and strip screw holes.
4. Reinstall sash and check operation.
For butt hinge,
Note! When removing hinge, notice position of each piece for
reassembly. The at piece goes on the frame, and the “dented” piece
goes on the sash.
1. Remove sash.
2. Unscrew and remove hinge.
*OTUBMMýBUIJOHFPOGSBNFBOEEFOUFEIJOHFPOTBTIJOTBNFQMBDFBT
old hinge.
4. Reinstall sash.
CASEMENT SASH ADJUSTMENT
OPERATOR ARM ADJUSTMENT
If a sash is not opening properly, the operator arm may have
disengaged from the sash. A quick x is to reengage the operator, but
JGUIFPQFSBUPSDPOTJTUFOUMZEJTDPOOFDUTGSPNUIFTBTIBEKVTUNFOUNBZ
be necessary.
"EKVTUPQFSBUPSBSNBTGPMMPXT
1. Detach long operator arm.
2. Grip arm with both hands, thumbs in the middle, slightly bend outer
FOEVQOPNPSFUIBOOFDFTTBSZNBY
3FBUUBDIMPOHPQFSBUPSBSN
4. Check window operation.
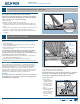
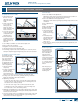
HINGE TRACK ADJUSTMENT
)JOHFUSBDLBEKVTUNFOUNBZCFOFDFTTBSZJGUIFTBTIJTESBHHJOH
does not t square or ush inside the frame or is not closing or
locking properly. Most factory installed casement hinge tracks are not
BEKVTUBCMF"XOJOHTVQUPJOIFJHIUNBZIBWFBEKVTUBCMFIJOHF
USBDLT"XOJOHTUBMMFSUIBOIBWFOPOBEKVTUBCMFIJOHFUSBDLT$BMM
PVSTFSWJDFEFQBSUNFOUGPSIFMQPSUPPSEFSBOBEKVTUBCMFDPODFBMFE
hinge track from us or your dealer. Install new hinge tracks by following
the instructions for hinge replacement earlier in this section.
5IFSFBSFUXPUZQFTPGBEKVTUBCMFIJOHFUSBDLT0OFTUZMFXJMMIBWFB
phillips head screw that is visible on the top of the hinge arm stud.
5IFPUIFSTUZMFJTBEKVTUFECFUXFFOUIFIJOHFBSNBOEUIFTUVEXJUI
BOBEKVTUNFOUUPPMPSBXSFODI"EKVTUNFOUTBSFNBEFXJUIPVU
removing the sash.
Caution! Some adjustments require removing the hinge arm from the
hinge arm stud. This will leave the sash unsupported and allow the
sash to move and possibly disengage from the window frame. Awning
hinge adjustments should be made one at a time with one hinge arm
attached to the stud at all times. Casement hinge adjustments should
only be made on the lower hinge. Keep the sash from moving until
the hinge arm is re-attached to the stud. If these adjustments are
not sufcient to correct operational problems, please contact us for
assistance.
continued on next page
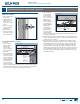
Hinge slide
Hinge arm
Hinge
assembly
Screws