
Operating Guide
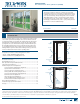


PRODUCT GUIDE
Wood Casement & Awning Windows (JPG009)
9
HARDWARE REPLACEMENT & ADJUSTMENT - CONTINUED
Casements Only:
*GTBTIOFFETBEEJUJPOBMMJGUBEKVTUNFOU
"EKVTUIJOHFUSBDLTUVEPGUPQIJOHFCZUVSOJOHXSFODIUPXBSEMPDL
side of window (opposite direction from lower hinge).
*GTBTIOFFETBEEJUJPOBMMPXFSJOHBEKVTUNFOU
"EKVTUIJOHFUSBDLTUVEPGUPQIJOHFCZUVSOJOHJUBXBZGSPNMPDLTJEF
of window.
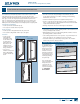
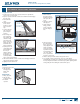
*GNPSFBEKVTUNFOUJT
needed:
Install a sash lift button
(available through
dealers) as follows:
1. Open window fully
to expose sash lift
button hole in hinge
slide.
2. Insert button into
sash lift button hole
in hinge slide. This
will lift the sash
when closed.
*GTBTIEPFTOPUPQFSBUFQSPQFSMZBGUFSUSZJOHUIFTFBEKVTUNFOUTDBMM
us for assistance.
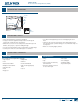
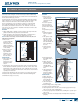
PUSH-OUT CASEMENT ADJUSTMENT
Friction may need to
be loosened before
removing sash and
always reset friction
after reinstalling.
Turn the friction
BEKVTUNFOUTDSFXUP
achieve desired tension
clockwise to tighten
and increase friction,
or counterclockwise to
loosen and decrease
friction.
If the hinge stop is
removed, make sure
to reinstall it after
installing sash
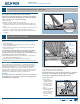
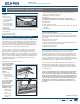
HINGE TRACK ADJUSTMENT - CONTINUED
IF a phillips head screw is visible:
1. Open window until
the two screws on
either side of the
hinge arm stud are
visible.
2. On the lower hinge
(or one side for
awnings) pry the
hinge arm off the
hinge stud with a at
head screwdriver.
-PPTFOUIFUXPUSBDL
screws on either side
PGBEKVTUBCMFTUVE
with three turns.
4. Insert a at head
screwdriver between
hinge track and sill,
MJGUJOHUIFUSBDL
above sill.
6TFB1IJMMJQTTDSFXESJWFSUPSPUBUFTUVEUPBEKVTUTBTI
3FNPWFýBUIFBETDSFXESJWFS
7. Retighten screws on both sides of stud.
4OBQIJOHFBSNCBDLPOUPBEKVTUBCMFTUVE
9. For awnings, repeat for the other side hinge. For casements, do not
BUUFNQUUPBEKVTUUIFVQQFSIJOHFUSBDLQMFBTFDBMMVTGPSBTTJTUBODF
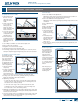
If a phillips head screw is NOT visible:
The hinge arm stud,
underneath the hinge
arm, can be shifted
XJUIFJUIFSB
open-end wrench, or
BOBEKVTUNFOUXSFODI
(available from our
service department).
1. Open the window
completely.
*GVTJOHBOBEKVTUNFOU
wrench, it will t
between the hinge
arm and hinge track
and is not necessary to remove the hinge arm from the stud.
*GVTJOHBPQFOFOEXSFODIHFOUMZQSZUIFIJOHFBSNGSPN
hinge arm stud with a at head screwdriver.
"EKVTUIJOHFBSNTUVE
to raise the outer edge of the casement sash, turn the stud away t
from the lock side of the window (to raise an awning sash, move
the stud to a more vertical position)
to lower the outer edge of the casement sash, turn the stud t
toward the lock side of the window (to lower an awning sash,
move the stud to a more horizontal position)
.BYJNVNTBTIBEKVTUNFOUJTSFBDIFEXIFOUIFýBUTJEFTPGUIFTUVE
are parallel to the hinge track. Turning the stud beyond parallel will
not increase sash correction.
$MPTFBOEPQFOUIFTBTIUPUFTUBEKVTUNFOU*GPVUFSFEHFPGUIFTBTI
OFFETGVSUIFSMJGUJOHPSMPXFSJOHBEKVTUUIFPQQPTJUFIJOHFJOUIF
other direction to achieve a proper t.
Concealed Hinge
Butt Hinge
"EKVTUNFOU
screw
"EKVTUNFOU
screw
Hinge stop
Sash
Hinge
arm
Hinge
arm
stud
Hinge track
Hinge
Minimum
sash lift
Maximum
sash lift
Hinge
slide
Hinge
track
Hinge
arm
Lift
button
hole
Hinge
arm
Hinge
arm
stud
Hinge
track
Hinge
arm
stud