
Operating Guide
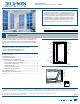

PRODUCT GUIDE
Vinyl Casement & Awning Windows (JPG005)
4
CASEMENT SASH - CONTINUED
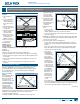
4. Make sure top and bottom hinge slides are fully engaged before
continuing.
4OBQUIFIJOHFBSNPOUPUIFIJOHFUSBDLTUVEBUUIFIFBEKBNCUIFO
the sill.
"UUBDIUIFFOEPGUIFKPJOUFEPQFSBUPSBSNUPUIFDPSOFSPGUIFTBTI
and engage the retaining clip (if applicable).
7. For windows with a notch under the sill, position the sash so the end
of the long operator arm engages (snaps) into the notch.
5FTUGPSQSPQFSPQFSBUPSBUUBDINFOUCZDSBOLJOHUIFPQFSBUPSPQFO
and closed.
3FQMBDFUIFJOTFDUTDSFFOJGQSFTFOUBOEWFSJGZUIFMPDLPQFSBUFT
properly.
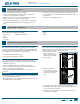
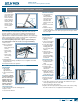
AWNING SASH
REMOVAL
1. Unlock and open
sash.
2. Locate the retainer
clips at the end of
the operator arms
where they connect
to the sash.
4MJEFUIFDMJQTBXBZ
from the sash, off of
each stud.
4. Hold the sash
rmly and remove
operator arms from studs.
SASH REMOVAL & INSTALLATION - CONTINUED
HARDWARE REPLACEMENT & ADJUSTMENT
5. Locate the clip at
UIF KBNC FOE PG
each hinge arm.
4MJEFUIFDMJQT
toward the sash, off
of the stud.
7. Hold the sash rmly
and remove hinge
arms from each
stud. The sash will
now be completely
unsupported.
5IFTBTIDBOOPX
be slid down until
the hinge slides
come out of the
hinge track.
INSTALLATION
1. Firmly grip sash.
2. Engage hinge slides into both sides at the same time.
4MJEFTBTIVQXBSEUPXBSEUIFUPQ
4. Install the hinge arms onto the studs and slide the clips back onto the
studs.
5. Install operator arms onto the studs on the sash and reattach the clips
to the studs.
5FTUGPSQSPQFSPQFSBUPSBUUBDINFOUCZDSBOLJOHUIFPQFSBUPSPQFO
and closed.
7. Replace the insect screen (if present) and verify the lock operates
properly.
OPERATOR REPLACEMENT - REMOVE HANDLE FOR ALL WINDOWS
1. Remove insect screen
from window (if
present).
2. Open the window
half way.
If there is a small t
set screw on the
side of the handle,
VTFBTNBMMýBU
head screwdriver to
loosen it to allow
removal of the
handle.
If there is no set t
screw, the handle is attached with a spring clip and can be removed
simply by pulling it off with a slight tug.
3FNPWFUIFIBOEMF
4. Grip the operator cover on both sides and lift up from underneath to
remove (some operator covers are not removable and are removed
through a hole in the frame).
CASEMENT OPERATOR REMOVAL & INSTALLATION
%VBMBSNDBTFNFOUPQFSBUPSTIBWFUIFKPJOUFEPQFSBUPSBSNXIJMF
single-arm operators do not.
REMOVAL
1. Follow the steps to remove the operator arm(s) listed in “Sash
Removal & Installation.”
2. Remove the screws holding the operator to the sill with a Phillips
screwdriver.
3FNPWFUIFPQFSBUPSUPUIFJOUFSJPS
Note! On some windows, there is a gasket under the operator. Remove
carefully to avoid damage. Re-use the gasket under the replacement
operator.
INSTALLATION
1. Replace the gasket under the operator (if applicable).
2. Reposition operator in hole and reinstall screws (do not over tighten).
3FBUUBDIUIFKPJOUFEPQFSBUPSBSNBOEUIFMPOHPQFSBUPSBSNUPUIF
sash.
4. Test operator by opening and closing sash. Remove and replace if
necessary.
5. Reinstall insect screen if applicable.
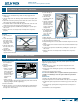
Set screwOperator
handle
Operator
attachment
screw
Retainer
clip
Hinge slide
Sash
Hinge
track
Jamb
Hinge
arm
Retainer
clip
Operator arm