
Operating Guide

PRODUCT GUIDE
Vinyl Casement & Awning Windows (JPG005)
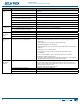
HARDWARE REPLACEMENT & ADJUSTMENT - CONTINUED
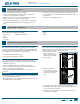
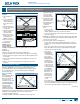
Remove the last t
screw in the hinge
track next to the
hinge arm. Place
the new sash lift
on the track over
the hole with the
short side to the
exterior. Secure
with the original
screw from the
track.
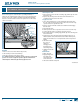
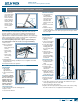
HINGE REPLACEMENT - ALL WINDOWS
Casement hinges are located at the top and bottom of the sash and
allow the window to open and close. Handing is determined by the
hinge location as viewed from the exterior. Hinges are either left or
right-handed. If a window has left-handed operation, the bottom hinge
will be a left-handed hinge, and the top hinge will be a right-handed
hinge. Awning hinges are located on each side.
Note! Before beginning replacement, compare replacement hinge to
the existing hinge to make sure it is the correct type and handing.
1. Remove sash.
2. Remove old hinge:
Fold operator/t
hinge arm(s) out of
the way.
Unscrew and t
remove hinge
track.
Unscrew and t
remove hinge
assembly.
*OTUBMMUIFIJOHF
track and the new hinge assembly. Do not over tighten screws and
strip screw holes.
4. Reinstall sash and check operation.
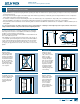
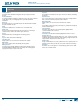
SINGLE - POINT LOCK & KEEPER REPLACEMENT
LOCK REMOVAL
1. Unlock and
open window
BQQSPYJNBUFMZ
2. Unscrew and remove
lock.
Note! A 42" or smaller
casement window may
have one lock. Larger
windows may have
multiple locks on the
same side. Awning
windows will have a
lock on both sides.
LOCK INSTALLATION
1. Slide replacement lock into existing groove.
2. Replace screws.
$MPTFBOEMPDLXJOEPX
KEEPER REPLACEMENT
1. Some keepers may
look different.
Always install the
new keeper in the
same place and
facing the same
direction as the old
keeper.
2. Remove screws and
keeper.
*OTUBMMOFXLFFQFS
on sash in the same
location and direction as the old keeper (open side of keeper should
face sash edge).
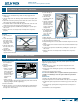
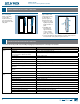
MULTI - POINT LOCK REPLACEMENT - CASEMENT WINDOWS ONLY
LOCK REMOVAL
1. Remove the screen.
2. Open the window
half way.
6OTDSFXBOESFNPWF
the latch assembly.
4. Locate the locking
mechanism and the
holding guides in
UIFTJEFKBNCPGUIF
window.
5. Hold onto the
locking mechanism,
unscrew and
remove the guides.
Remove the locking
mechanism.
LOCK INSTALLATION
1. Position the locking
mechanism in the
KBNC
2. Secure each guide.
*OTFSUUIFMBUDI
assembly and secure
with screws.
4. Replace the screen if
applicable and test
operation by closing
and locking the sash.
KEEPER REPLACEMENT
1. Remove the screen.
2. Open the window
half way.
-PDBUFUIFMPDLLFFQFSTPOUIFTBTIFEHF5IFOVNCFSPGLFFQFST
varies depending on the size of the unit.
4. Unscrew and remove the keeper(s).
5. Replace the new keeper(s) in the exact position as the old one, using
the same screws. Do not over tighten screws and strip holes.
Hinge slide
Hinge arm
Lock latch
Lock
keeper
Lock
Sash
Hinge
assembly
Screws
Latch
assembly
Locking
mechanism
Guide
Keepers
on sash
Hinge arm
Sash
lift
Hinge track