
Operating Guide


PRODUCT GUIDE
Vinyl Casement & Awning Windows (JPG005)
5
HARDWARE REPLACEMENT & ADJUSTMENT - CONTINUED
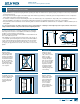
AWNING OPERATOR REMOVAL & INSTALLATION
REMOVAL
1. Unlock and open
sash.
2. Locate retainer clips
at the end of the
operator arms where
they connect to the
sash.
4MJEFUIFDMJQTBXBZ
from the sash and off
of each stud.
4. Support the sash and
remove operator
arms from studs.
5. Remove the screws
holding the operator
to the sill with a
Phillips screwdriver.
3FNPWFUIFPQFSBUPS
to the interior.
Note! On some
windows, there is
a gasket under the
operator. Remove
carefully to avoid damage. Re-use the gasket under the replacement
operator.
INSTALLATION
1. Replace the gasket under the operator (if applicable).
2. Reposition operator in hole and reinstall screws (do not over tighten).
*OTUBMMPQFSBUPSBSNTPOUPUIFTUVETPOUIFTBTIBOESFBUUBDIUIFDMJQT
to the studs.
4. Test for proper operator attachment by cranking the operator open
and closed.
5. Replace the insect screen (if present) and verify the lock operates
properly.
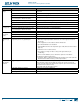
CASEMENT HINGE ADJUSTMENT
*GUIFTBTIJTESBHHJOHPOUIFTJMMPSEPFTOPUåUTRVBSFMZPSýVTIJOTJEF
UIFGSBNFBEKVTUNFOUJTOFDFTTBSZ5IJTJTQPTTJCMFJGUIFIJOHFPO
UIFTJMMVOEFSOFBUIUIFXJOEPXJTBEKVTUBCMF"XOJOHXJOEPXIJOHFT
BSFOPUBEKVTUBCMF4PNFDBTFNFOUXJOEPXIJOHFTBSFBEKVTUBCMF
determine as follows:
NON - ADJUSTABLE
HINGES
"OPOBEKVTUBCMFIJOHF
has a retaining clip
attached to the hinge
arm. Call a service
technician for help with
OPOBEKVTUBCMFIJOHFT
ADJUSTABLE HINGES
A hinge without
a retaining clip is
BEKVTUBCMF5IFIJOHF
arm stud, underneath
UIFIJOHFBSNDBOCFTIJGUFEXJUIFJUIFSBPQFOFOEXSFODIPSBO
BEKVTUNFOUXSFODIBWBJMBCMFGSPNPVSTFSWJDFEFQBSUNFOU
1. Open the window completely.
*GVTJOHBOBEKVTUNFOUXSFODIJUXJMMåUCFUXFFOUIFIJOHFBSN
and hinge track and
is not necessary to
remove the hinge
arm from the stud.
*GVTJOHBPQFO
end wrench, gently
pry the hinge arm
from hinge arm stud
XJUIBýBUIFBE
screwdriver.
"EKVTUIJOHFBSN
stud:
to raise the outer t
edge of the sash,
turn the stud away from the lock side of the window
to lower the outer edge of the sash, turn the stud toward the lock t
side of the window.
.BYJNVNTBTIBEKVTUNFOUJTSFBDIFEXIFOUIFýBUTJEFTPGUIFTUVE
are parallel to the hinge track. Turning the stud beyond parallel will
not increase sash correction.
$MPTFBOEPQFOUIFTBTIUPUFTUBEKVTUNFOU
*GPVUFSFEHFPGUIFTBTIOFFETMJGUJOHBEKVTUIJOHFBSNTUVEBUt
the top of the sash by turning the stud toward the lock side of the
window.
*GUIFPVUFSFEHFPGUIFTBTIOFFETUPCFMPXFSFEGVSUIFSBEKVTUt
hinge arm stud at the top of the sash by turning the stud away
from the lock side of the window.
If sash needs t
further lifting, a
sash lift button
or riser block may
be an option.
Many windows
already have these
installed. If the
window does not
have a lift button
or riser block, call
a supplier or our
service department
for availability.
Insert sash lift
button into sash
button hole, or
install the riser
block as shown.
This will lift the
sash when it is
closed.
If the window has t
a riser block and has binding issues, a new sash lift is available from
our service department. If the riser block is not oriented as shown,
remove the screw and reinstall in the opposite position.
Non-Adjustable Hinge with Retainer Clip
...Continued
Operator
Operator
attachment
screws
Retainer
clip
Retainer
clip
Hinge
arm
stud
Operator arm
Hinge
arm
Hinge
arm
stud
Hinge arm
Hinge arm
Hinge
Hinge
Hinge
slide
Lift button
Riser block
Jamb
Sill
Hinge track
Hinge
Minimum
sash lift
Maximum
sash lift
Hinge track
Hinge track