
Installation Guide
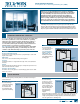

INSTALLATION INSTRUCTIONS
for Vinyl Patio Doors with Integral Nailing Fin (JII006)
6
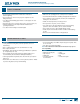
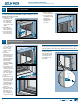
1. Seal the upper
corners of the patio
doorwitha1/4"
bead of sealant.
Tool into a llet
shape.
2. Release the
building wrap from
above the header
(previously taped
up) and overlap the
header ashing.
Seal the ends
with self-adhesive
ashing or building
wrap tape.
3.Forcontinuousslab
landings, apply a
1/4"beadofsealant
around the sill
where it meets the
slab. Leave gaps at
the weep holes as
shown.
4.Ontheinterior,seal
the lower 6" of gap
between the rough
opening and door
jamb with backer
rod and sealant on
both sides of the
patio door.
5.Ensuresealanton
back dam of the sill
pan fully seals to
the inside face of
the sill. Apply more
sealant as necessary.
6. Press the ashing
down with a J-roller.
7.Donotallowgaps
or bubbles beneath
self-adhesive
ashing (remove
and replace if
necessary).
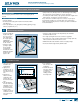
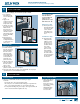
APPLY THE SELF-ADHESIVE FLASHING
Note! Keep the edge of the JELD-WEN self-adhesive ashing as close to
the patio door frame as possible.
3.Ifapplicable,center
and apply the sill
piece underneath
the sill (bottom
1/2" of the drain
screen must remain
visible).
4.Applytheside
piecesstarting5"
above the header.
5.Centerandapply
the header piece
above the header.
6
7
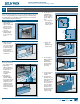
FLASH PATIO DOOR - CONTINUED
COMPLETE INSTALLATION
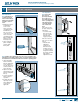
5"
5"
5"
Step
height
minus 1"
7"
1"
Sealant
6"
SUPPORT TRIM (STEP-DOWN LANDING ONLY)
On the exterior, install support trim underneath the sill where it extends
past the landing. Position trim snugly against the bottom of the sill toe.
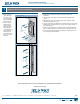
INSTALL BUMPER (BUILDERS ONLY)
Install the bumper in
the stationary panel
side jamb at vertical
center using the 1"
self-tapping screw
provided.
Builders Patio Door
6"
6"
Strike
plate
Interior
Bumper