
Instructions / Assembly
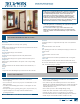

INSTALLATION INSTRUCTIONS
3
3
trimmed from each
side. For the best
appearance, trim an
equal amount from
opposite sides. To
minimize chipping,
stick masking tape
along the cut line
to each face of the
slab. Make the cuts
with a ne toothed
and wood plane
beveled edges may
clearance between
the jamb and latch
edge and improve
the t when the
slab is closed. If
the latch stile is
not beveled, and a
bevel is preferred,
use a wood plane
to cut a bevel so
that the slab face
that rests against
the stop becomes
slightly narrower
than the opposite
face.
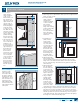
TEST SLAB FIT IN JAMBS
hardware, t the
slab in the frame
and verify it will t
properly. Looking at
the hinge side of the
slab when it is closed,
gap between the
slab and hinge jamb
slab and the head and
strike jamb.
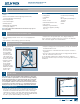
rail
Stile
Top rail
portion
portion
Slab
Stop
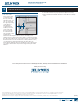
INSTALL HINGES
jambs, verify the
locations are plumb,
or all in a straight
line vertically.
Position the new
locations and modify
the mortises as
necessary. Match the
slab to the jambs
using the following
instructions.
jambs, measure
down from the
underside of the
to position the top
of the top hinge.
Measure up from
the bottom of the
the bottom of the
bottom hinge. Place
the middle hinge
halfway in between.
slab for hinges, make
sure the measurement from the top of the slab to the top of the
and head jamb.
slab, the distance
from the inside face
to the back of the
hinge route should
depth of the hinge
route on the jamb.
mark the jambs
and slab where
the hinges will be
a chisel or router,
notch the jamb and
slab for the outline
of the hinge leaves and no deeper than the thickness of the leaves.
pilot holes for all screws. If possible, it may be easier to remove the
drive the pin from the open end. Install the hinge leaves separately
on the jambs and slab. Then, hang the slab in the frame by aligning
the hinge leaves and reinstall the hinge pins.
Plumb
line
Slab
Hinge
jamb
Stop