
Instructions / Assembly


INSTALLATION INSTRUCTIONS
for Vinyl Projecting Windows with Integral Nailing Fin (JII023)
2
1
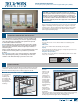
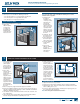
REMOVE PACKAGING AND INSPECT WINDOW
MATERIALS
Note! Follow all material manufacturers’ instructions for proper use
and compatibility.
• 1 3/4" galvanized roong nails. Nails must penetrate at least 1" into
framing (or as required by local code).
• #10 x 3 1/2" corrosion resistant pan head screws. Screws must
penetrate at least 1" into framing (or as required by local code).
• Non water-degradable or compressible shims to level the sill
• 4", 6", or 9" (as required by local code and window conguration)
wide self-adhesive ashing: We recommend OSI
®
QUAD
®
Butyl
Flashing Tape or equivalent.
• Spray adhesive/primer for self adhesive ashing. Such as Loctite
®
300
or equivalent
• Sealant: We recommend OSI
®
QUAD
®
Max Sealant or equivalent. This
can be used in any application and can be painted or ordered in a
color matched product, if desired.
REMOVE PACKAGING
Remove shipping materials such as corner covers, shipping blocks or
pads. If there is a protective lm on the glass, do not remove it until
installation and construction are complete.
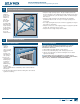
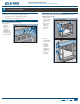
INSPECT YOUR WINDOW
• Cosmetic damage
• Product squareness (diagonal measurements not more than 1/8"
different)
• Correct product (size, color, grid pattern, handing, glazing, energy-
efciency requirements, etc.)
• Cracked frame welds
NEEDED MATERIALS AND TOOLS
• Backer rod 1/8" larger than the widest portion of the gap (used in
conjunction with sealant bead).
• Polyurethane low expansion Window and Door foam: We recommend
OSI
®
QUAD
®
Foam or equivalent).
• Non water-degradable or compressible shims
TOOLS
• Tape measure
• Utility knife
• Level (4' minimum
recommended)
• J-roller
• Caulking gun
• Drill with 1/8" tapered bit and
3/8" countersink
• Construction stapler with 3/8"
staples
• Hammer
SAFETY
• Read and fully understand ALL manufacturers’ instructions before
beginning.
• Do not work alone. Two or more people are required. Use safe lifting
techniques.
• Use caution when handling glass. Broken or cracked glass can cause
serious injury.
• Wear protective gear (e.g. safety glasses, gloves, ear protection, etc.).
• Operate hand/power tools safely and follow manufacturer’s operating
instructions.
• Use caution when working at elevated heights.
SAFETY AND HANDLING
WINDOW AND MATERIALS HANDLING
• Make sure operable windows are closed and locked prior to
installation.
• Heed material manufacturers’ handling and application instructions.
• Protect adhesive surfaces from dirt, moisture, direct sunlight and
folding over onto themselves.
• Handle in vertical position; do not carry at or drag on oor.
• Do not put stress on joints, corners, or frames.
• Store window in dry, well-ventilated area in vertical, leaning position
to allow air circulation; do not stack horizontally.
• Protect from exposure to direct sunlight during storage.
• Install only when conditions and sheathing are dry.
IF INJURY OCCURS, IMMEDIATELY SEEK MEDICAL ATTENTION!
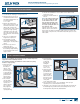
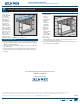
• Splits, cracks, holes, missing sections or other damage to the nailing
n longer than 6" and/or within 1/2" of window frame
• For units with integral head and seat boards, ensure the top of the
mull joints are covered and sealed with silicone.
If any of the above conditions represent a concern, or if you expect
environmental conditions to exceed the window’s performance rating,
do not install the window. Contact your dealer or distributor for
recommendations.