
Instructions / Assembly

INSTALLATION INSTRUCTIONS
for Vinyl Projecting Windows with Integral Nailing Fin (JII023)
3
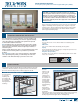
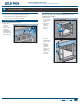
FOR RETROFIT INSTALLATIONS
1. Remove
sufcient
siding to
expose enough
intact building
wrap to
properly seal
the window to
the opening.
2. Remove the
old window. If
building wrap
is damaged,
apply new
building wrap
in shiplap
manner. Verify
trimmer studs/header are structurally sound. Continue with the
instructions.
3. Trim the sides sufciently to allow the nailing n to be mounted
against the sheathing.
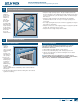
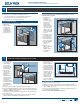
INSPECT ROUGH OPENING
2
• Verify the
width and
height of the
bay or bow
window are
each 1/2"
smaller than
the rough
opening width
and height. The
rough opening
for the garden
window should
be the same
size as the
window frame.
A
B
D
C
E
• Verify the rough opening is square. The (A) and (B) measurements
above should be the same. Maximum allowable deviation from square
is 1/8" for windows 20 sq. ft. and smaller, and 1/4" for windows larger
than 20 sq. ft.
• Verify the rough opening is level and plumb (C). The maximum
allowable deviation is 1/16" for every 2' of rough opening (not to
exceed 1/8").
• The rough opening sill must not be crowned or sagged (D). A 5
degree
sloped sill is recommended.
• Verify the exterior face of the rough opening is a single plane (E) with
less than 1/8" twist from corner to corner.
• Verify the header is supported by trimmer studs.
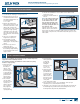
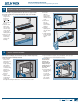
PREPARE ROUGH OPENING
3
45°
PREPARE BUILDING WRAP
Note! Check with the building wrap manufacturer to verify the
following steps will not void their product warranty. Follow
manufacturers' instructions.
1. Trim building wrap ush with the rough opening.
2. At the head, cut building wrap at 45° and tape up as shown.
3. Trim the sides sufciently to allow the nailing n to be mounted
against the sheathing.
Note! If installing a bay or bow window, proceed with section 4
“PREPARE SILL FOR BAY/BOW WINDOW.” If installing a garden window,
skip to section 8, “PREPARE SILL FOR GARDEN WINDOW.”