
Use and Care Manual


10
PREPARE TO FINISH
PREPARE WOOD SURFACE
1. Observe weather conditions.
• Donotattemptpainting/nishinginwetweatherorany
extremeenvironmentalconditions.
• Thenormaltemperaturerangerecommendedbypaint
manufacturers is 50°-85°. After nish application, the
temperature should not drop below the minimum
for at least four hours. Some products have a wider
temperature range.
• Therelativehumidityshouldbebelow85%.Relative
humidity can be measured with a hygrometer, found at a
local hardware store or home center.
• Paint/nishinalocationthatiswelllit,butnotindirect
sunlight and allows plenty of ventilation.
2. Check wood moisture content.
Donotbeginprojectifwoodmoisturecontentexceeds16%.
Checkusingahand-heldmoisturemeter(shouldbeavailable
atlocalhardware,homeimprovementorpaintstore)or
gentlysandthesurfacewithnegritsandpaper.Fine,uffyor
powder-like dust means the wood is dry, but if the sandpaper
lls with wood residue, the wood is too wet.
3.Prepareenoughmaterialtocompletetheproject.
PREPARE DOUBLE-HUNG SASH
On double-hung windows, the moving sash stile edges that
comeincontactwiththejamblinersneedtobesealed,not
painted. The sealer should be a high-quality waterproong
product applied to the sash edge to adequately seal the wood
while not causing operational problems.
Minimize the lm thickness on the sash edge. Sash stile edges
that have weatherstrip and do not come in contact with the
sidejamborjamblinermaybepaintedthesameastherestof
the window.
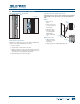
PREPARE PHANTOM SCREEN
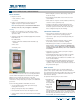
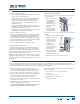
®
Non-Removable Screen Tracks: Casement & Awning Windows
1. Open window.
2. Remove the housing
cover by tilting the
cover upward to
detach from the
housing. Once cover
detaches, carefully
pullaway).
3. Reattach housing
cover once stain is
thoroughly dried.
Removable Screen Tracks: Double-Hung & Horizontal Gliding
Windows
1. Grip lower end of the screen track.
2. Applying even, steady
pressure, carefully
pull the track until
it releases from its
holding clip.
3. Continue pulling
bottom of track until
itis6inchesaway
from the stile.
4. Tilt track toward you
and pull down and
away from housing cover.
5. Repeat steps 1-4 to remove remaining track.
2
3
Proper wood surface preparation is essential before nishing. Clear coat renishing may vary depending on the type of nish
previously used. Mildew stains must be removed before nishing or renishing. Seek professional help if unsure. This section covers
woodpreparationforexteriorandinterior,newandpreviouslynishedwoodsurfaces.
1.Remove(double-hung,single-hung,slider)oropen
(casement,awning,basement)sashbeforenishing.Allow
the sash to completely dry before reinstalling or closing.
2. Remove or protect hardware and other non-wood items
suchasgaskets,hinges,locks,jamblinersandweatherstrip
from nishing and/or damage. Do not allow nishing
products to come into contact with these parts.
3.Removeallloose,peeling,aking,orscalingpaintwithout
gouging the wood surface.
4.Fillallholes,gouges,scratches,dents(seefollowingtip),or
other imperfections with wood putty.
Note! Water-based putty can react with screws, nails and
staples and cause rust stains on the wood surface.
TIP:Usethefollowingmethodtosteamawaydents(ifwood
bersarestillintact):
a. Place a drop or two of water on the dent.
b. Let soak.
c. Cover with a wet cloth.
d. Heat with tip of a warm iron.
e. Let dry thoroughly.
Housing
cover
Fixedscreen
track
Holding
clip
Screen
track