
Instructions / Assembly


7
Barn Door Instructions
(JII114)
STEP 3: TRACK INSTALLATION FOR RUSTIC AND MODERN
STEP 4: HANGING BARN DOOR ON TRACK FOR RUSTIC AND MODERN
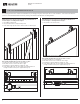
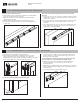
Fasten the track to the backer board.
1. Start by using (1) of (6) standoffs in line with the second pre-drilled
hole to fasten the track using a lag screw
2. Make sure standoffs are positioned with the wider base resting
against the backer board
3. Include a 8mm washer between the track and each lag screw.
4. Continue fastening lag bolts with a crescent wrench, skipping the
1
st
and 6
th
lags
Figure 13. Installing Track
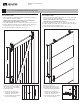
Next, slide on the left and right cushioned stops to either end of
the track.
1. If using a 42" door in a 36" opening, the cushioned stops (in contact
when the door is in the closed position) will have to be positioned
at the ends of the track
2. For all other door sizes, it is recommended that the cushioned stops
be placed between the 1st and 2nd lag and the 5
th
and 6
th
lag
if possible
3. Once cushioned stops are in loosely place (To be tightened in next
steps), install 1
st
& 6
th
lags (lags may need to be removed in step 4
temporarily to install Floor Guide)
Figure 14. Sliding on Cushioned Stops
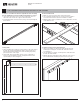
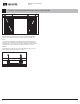
1. First, swivel the anti-jump disks away from the door
2. Next, (using two people) lift door and align hangers over track,
gently lower hangers into contact with track. Once the track is
supporting the door, rotate the anti-jump disks so that they are under
the track and tighten their screws to stop further rotation
Figure 15. Anti-Jump Disks Placement Figure 16. Anti-Jump Disk Final Position
Figure 18. Secure Cushioned Stop with Allen Key
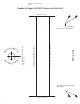
Once the door is hanging plumb, install the oor guide
1 3/8"
Figure 17. Positioning Floor Guide
3. Position the guide so it lines up centered with the channel on the
bottom of the door, roughly 1-3/8" from the edge of the wall to
the interior edge of the guide
Ensure installed Floor Guide will always be fully engaged through
doors desired range of movement (fully open/fully closed)
4. Mark the two hole locations with a pencil and pre-drill with a
1/8" bit (If installing in concrete ooring, use 1/4" bit and
supplied anchors)
5. Tighten the Floor Guide with (2) ST4.2 x 25mm screws to a snug t,
while ensuring that the Floor Guide is well engaged with the door’s
bottom channel
6. Secure cushioned stop using provided set screws