
Instructions / Assembly


4
Barn Door Instructions
(JII114)
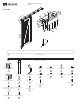
STEP 1: DOOR HARDWARE INSTALLATION
RUSTIC KIT
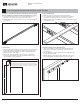
Attach Hangers to front side of door through the pre-drilled holes as
shown in Figure 1. Installing Rustic Hangers.
1. Use (4) M10 X 60mm bolts
2. Use (8) 10mm washers at entry and exit points
3. Secure bolts using cap nuts on the exterior surfaces of the hangers
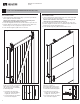
MODERN KIT
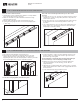
Attach hangers to top surface of door through pre-drilled holes as
shown in Figure 3. Installing Modern Hangers.
1. Use (4) #14 x 1 1/2" wood screws
Figure 1. Installing Rustic Hangers
Figure 3. Installing Modern Hangers
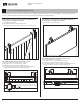
The following instructions are written for installation into preexisting passageways and require the use of the included 1" X 4" X 84" backer board. If
you choose to install without the backer board, each lag screw must be embedded into a framing member.
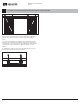
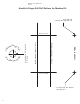
Next, install anti-jump disks onto the top surface of door.
1. Position the center of the disks as seen in Figure 2
2. Place disks at least 7" in from the door’s edges
3. Pre-drill holes with 1/8" drill bit, roughly 5/8" deep
4. Secure with (2) #8 X 3/4" wood screws (keep anti-jump disk loose
enough for future rotation; to be tightened in step 4)
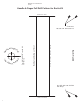
Next, install anti-jump disks onto the top surface of door.
1. Position the disks as seen in Figure 4
2. Place disks at least 9 1/2" in from the door’s edges
3. Pre-drill holes with 1/8" drill bit, roughly 1/2" deep
4. Secure with (2) #8 X 3/4" wood screws (keep anti-jump disk loose
enough for future rotation; to be tightened in step 4)
Figure 2. Pre-drilling Anti-Jump Disk
Figure 4. Pre-drilling Anti-Jump Disk
7" 7"
9 1/2" 9 1/2"