
Installation Guide


INSTALLATION INSTRUCTIONS
for Bifold Doors (JII103)
4
INSTALLATION FOR TYPE A1 - A4
3
PARTS INCLUDED
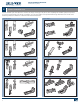
1. Using a hammer, gently tap
pivot pins and guide into
the pre-drilled holes in the
locations shown.
2. Position overhead track
in the opening with the
open side down and the
bracket end toward the
jamb. Center the track, or
allow at least 3/4" between
the track and the front of
the opening. If installing a
double set with two tracks,
insert the track bracket into
the two ends where they
meet in the middle and
push the tracks together.
The holes in the bracket
should align with the holes
in the tracks. Center the
entire assembly side to side
in the opening. Secure the
track with the long pan
head screws through the
pre-drilled holes until snug. If installing four panels with two tracks, use
a track bracket between the two ends in the center.
3. Position the lower bracket on the oor in line with overhead track.
The bottom of the bracket must rest securely on the oor or carpet.
Fasten to the jamb and oor with a long at head screw through
each hole.
4. Place the upper pivot
pin in the hole in
the bracket and the
guide in the track (or
in the middle of the
slide guide between
the springs). Lift
the door assembly
slightly and drop the
lower pin into the
lower bracket slot.
5. Verify there is a 1/4"
clearance between
the pivot door and
the jamb. Four panel
assemblies should be snug at the middle. If adjustments are necessary,
door panels should be folded, in some cases removed, to gain access
to the adjustment screws.
To adjust horizontally:
6. At the top, loosen
the screw in the
top pivot bracket
and move toward
or away from the
jamb until there
is 1/4" clearance.
Re-tighten.
7. At the bottom, lift
assembly and move
the adjusting wheel
toward or away from
the jamb until doors
are plumb with jamb,
then lower into
bracket.
To adjust vertically:
8. Lift assembly slightly
until the adjustment
wheel clears the
slot in the lower
bracket. Rotate the
adjustment wheel to
the left to raise doors
or to the right to
lower them. Be sure
the teeth lock rmly
into bracket when
nished.
9. Snap the snugger
or slide guide into
the lead door end of
the track as shown,
or in the center of
the track between
guides in a four door
installation. If using
a slide guide, seat
lead door guide pin
between the two
springs in the guide
as shown.
SKIP to Section 8,
“COMPLETE INSTALLATION.”
OR
OR
OR
Upper Pivot Pin
Guide for Track
Snugger or slide guide Lower pivot pin
Lower Bracket
Track Slide (optional)
Knob
Aligner
Track
Track bracket
(used only for double systems)
OR
OR
Guide
Upper
pivot pin
Jamb
side
Lower
pivot pin
Lower
bracket
Bracket
Pin
Horizontal
adjustment
screw
Adjusting
wheel
1/4"
Snugger
Slide guide