
Instructions / Assembly
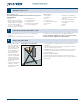
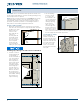
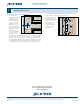
Table Of Contents

4
Installation Instructions
for Interior Door Slabs (JII110)
©2023 JELD-WEN, Inc. This publication and its contents are owned by or licensed to JELD-WEN, Inc. or its afliates or third parties, and are protected by copyright, trademark, and other laws. Unauthorized use
or duplication is prohibited. JELD-WEN reserves the right to change product specications without notice. Please visit our website at jeld-wen.com for current information.
All rights reserved.
Please visit jeld-wen.com for warranty
and care and maintenance information.
Thank you for choosing
JII110 10/23
COMPLETE INSTALLATION
Install Lock Set and Finish Installation
1. The center of the
hole for the lock set is
usually 36" from the
bottom edge of the
slab and either 2 3/8"
or 2 3/4" on-center
from the latch edge,
depending on the
lock set. For slabs that
have a rail (horizontal
member) across the
center of the slab,
the lock set should be
centered on this rail.
Generally, a 2 1/8"
diameter hole is needed for the lock set. Drill a 1" latch hole through
the edge of the slab into the center of the lock hole to accommodate
the latch for the lock. Some latches have a radius (rounded corners)
or rectangular face plate that will require the slab edge to be chiseled
for t. Drill pilot holes for attachment screws. Other latches are round
(contractor drive-in) and can be tapped into place with a hammer.
2. Close the slab and check for proper operation. Adjust as necessary.
3. Finish all surfaces of the slab if not already done.
4. If installing a solid core,
premium composite or
stile and rail slab, install
a #9 x 2 1/2" screw
in the center hole (as
shown) in the top
two hinges (through
the leaves toward
the jamb).
Lock set
hole
Rail
Panel
Latch
hole
2 3/8"
Jamb
Replace with
longer screw