
Instructions / Assembly


4
JELD-WEN DesignGlide Barn Door Hardware System Installation
(JII-90003)
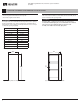
30 1/2"
Stile Width
30 1/2"
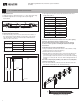
Predrill for handle.
If the door design selected for this kit includes stiles, it is recommended
that the handle is installed at the center of the stile. This can easily be
achieved through the use of the rulers included on the Handle Drill
Guide, on Page 12. Simply measure the stile width of the door, and fold
the guide along the same measurement, shown in Figure 7.
If the door does not include stiles, fold as indicated on guide.
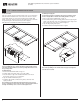
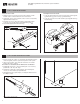
Predrilling for finger pull.
An optional finger pull is included in the kit. Before installing, ensure
the door design adheres with the stile width guidelines on Page 2.
1. Remove the Finger Pull Drill Guide on Page 13.
2. Fold as indicated on guide and wrap guide around door, placing the
guide on the backside of the door, aligning the bottom edge 30 1/2"
above the bottom of the door as shown in Figure 8.
3. Tape the nger pull guide in place.
4. Predrill to diameter and depth indicated on guide.
Figure 8. Aligning Finger Pull Drill Guide to Door.
Figure 7. Aligning Handle Drill Guide to Door.
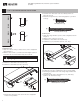
Before predrilling the door, ensure the handle is being installed on the
side of the door that will be closest to the opening when the door is in
the opened position.
Predrilling handle
1. Remove the Handle Drill Guide on Page 12.
2. Fold the guide along rulers at the correct stile width.
3. Place the bottom edge of the Handle Drill Guide 30 1/2" above
the bottom of the door as seen in Figure 7.
4. Tape the Handle Drill Guide in place.
5. Predrill for kit’s handle as indicated on guide, to diameter and
depth prescribed.
Note: If drilling for the Modern handle apply blocking to the back of
the door, clamping it in place under the area of door that will be drilled
through. This will help create a clean hole through the door.
Note: After predrilling for the handle and/or finger pull, sand/paint/
stain the door if desired.
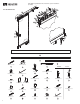
STEP 1: DOOR HARDWARE INSTALLATION