
Instructions / Assembly

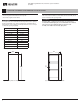


5
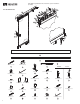
JELD-WEN DesignGlide Barn Door Hardware System Installation
(JII-90003)
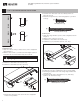
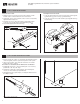
STEP 2: SIZING RAIL AND PREDRILLING FOR END CAPS
Drilling for End Caps.
Place rail in configuration seen in Figure 4.
1. Place an end cap ⑪ inside the rail ③, ensuring it ts ush with end
of the rail.
2. Rotate the end cap to the top of the rail as shown in Figure 5.
3. Mark the end cap’s fastening hole on rail.
4. Predrill through the rail using a 1/4" drill bit.
5. Repeat for the remaining ends of both rails.
Figure 4. Matching End Cap to Rail
Figure 5. Marking End Cap on Rail
Figure 6. Rail Predrilled for End Cap
⑪
③
⑪
③
③
Rail Width - Door Width
2
A =
.
A
A
A
A
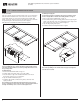
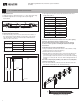
DesignGlide hardware is capable of being cut down 6" from the kit’s
stock rail ③ length to support custom width doors.
If you are using a door width that is smaller than the kit’s stock rail
width, follow the steps below. If not, skip to the next step, Drilling for
End Caps.
Sizing Rails
1. Both the top and bottom rails ③ need to be cut symmetrically. Use
the formula below to determine your cut dimension 'A'.
Rail Width
Door Width
Figure 3. Cutting Rails for Custom Width Door
2. Mark each rail at the 'A' dimension.
3. Slowly cut both rails symmetrically with a miter saw, using a metal
cutting blade.
4. Finish and smooth all edges with le/ne sand paper.
5. If cutting a rustic kit, renish ends with black paint.
Kit Max Door Width Minimum Door Width
36" (72" track) 36" 30"
42" (84" track) 42" 36"
Table 2. Minimum Door Width
③
③