
Installation Guide


A
B
22 OR 24
11
JELD-WEN DesignGlide Barn Door Hardware System Installation
(JII-90003)
STEP 9: INSTALL AND ADJUST SOFT CLOSE TRIGGERS
Attach soft close triggers.
1. Slide the door to the center of the track.
2. Check the position of soft close catch. Both should be loaded towards
the center as noted in Step 5: Soft Close and Track Installation, Figure 17.
3. Remove the anti-jump rod from the trigger assembly.
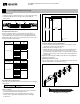
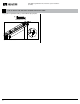
4. Slide the trigger onto the rail using the measurements found in
table 5.
a. Measurement 'A' is taken from the edge closest to the handle, as
shown in gure 25.
b. Measurement 'B' is taken from the opposite edge of 'A'.
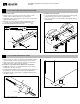
5. Secure the triggers⑨ in place with the set screws using the supplied
3mm Allen wrench ⑩ as seen in Figure 24.
6. Secure the anti-jump rod back into the trigger block using the
supplied 3mm Allen wrench.
Note: Fine adjustments to the open and closed positions of the door by
loosening the set screws and sliding to the desired position and
re-tightening the set screw in the trigger.
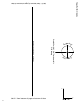
Anti-Jump
Rod
Figure 24. Trigger Installation
Figure 25. Trigger Alignment
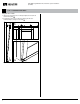
Figure 26. Vertical Section
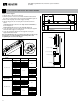
Table 5. Trigger Locations
Kit Size
(Track Length)
Door Width A B
36" (72" track)
30" 5 1/2"
1/2"
30 1/2" 6 1/2"
31" 7 1/2"
31 1/2" 8 1/2"
32 9 1/2"
32 1/2" 10 1/2"
33"
10 1/2"
4 1/2"
33 1/2" 5"
34" 5 1/2"
34 1/2" 6"
35" 6 1/2"
35 1/2" 7"
36" 7 1/2"
Kit Size
(Track Length)
Door Width A B
42" (84" track)
36" 5 1/2"
1/2"
36 1/2" 6 1/2"
37" 7 1/2"
37 1/2" 8 1/2"
38" 9 1/2"
38 1/2" 10 1/2"
39"
10 1/2"
4 1/2"
39 1/2" 5"
40" 5 1/2"
40 1/2" 6"
41" 6 1/2"
41 1/2" 7"
42" 7 1/2"
Set Screws
Hanger
⑭
Soft Close Trigger ⑨
Anti-Jump Rod ⑨
Top Rail ③
Soft Close Track ②
Door
⑨
⑩
⑨