
Installation Guide
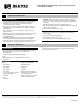
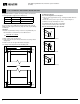


WALL
WALL
WALL
WALL
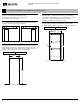
1
2
3
4 5 6
6
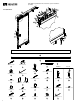
JELD-WEN DesignGlide Barn Door Hardware System Installation
(JII-90003)
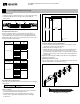
STEP 3: TOP AND BOTTOM RAIL INSTALLATION
Top
Bottom
Top Rail
Bottom Rail
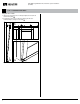
Figure 10. Rail Orientation
Figure 11. Mounting Pattern
Figure 12. Attach Rail to Bottom of Door
Pan Head, #10 x 1" (2)
Pan Head, #14 x 2 1/2" (2)
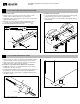
Figure 13. Attach Rail and Hangers to Top of Door
Flat Head, #14 x 2 1 /2" (4)
Predrill bottom rail.
1. Align one of the two rails ③ to bottom of door, in the conguration
shown in Figure 10.
2. Mark the center of holes 1, 3, 4 and 6 as shown in Figure 11, (holes 2
and 5 will not be used on the bottom rail), remove the rail.
3. Predrill holes 1 and 6 with an 1/8" bit, 3/4" deep.
4. Predrill holes 3 and 4 with a 5/32" bit, 1 7/8" deep.
5. Realign rail to the bottom of the door in the same conguration
as the door was predrilled.
6. Fasten the rail to the bottom of the door with (2) #14 x 2 1/2"
pan head screws ⑬.
7. Install the end caps into holes 1 and 6 using (2) #10 x 1" pan head
screws ⑫.
Predrill top rail.
1. Align other rail ③ with the top of door, in the conguration shown in
Figure 10.
2. Mark the center of all holes, remove rail.
3. Predrill holes 1 and 6 with an 1/8" bit, 3/4" deep.
4. Predrill holes 2, 3, 4, and 5 with a 5/32" bit, 1 7/8" deep.
5. Realign rail to the same conguration as the door was predrilled.
6. Place hangers ⑭ with the stem of the hanger aligned with the at
wall of the rail.
7. Fasten the hangers in place through holes 2, 3, 4, and 5 using
(4) #14 x 2 1/2" at head screws ⑮.
See Figure 26 for a vertical section
of a complete installation.
③
③
or
⑪
③
⑬
⑫
⑫
⑭
③
⑮
⑮
⑬