
Installation Guide


JELD-WEN DesignGlide Barn Door Hardware System Installation
(JII-90003)
8
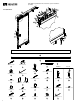
STEP 5: SOFT CLOSE AND TRACK INSTALLATION
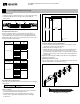
Install soft close to track.
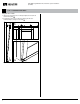
1. Align the soft closes ⑱ on the track as shown in Figure 17, with
movable catches loaded towards the center of the track.
2. Verify plastic spacers are inserted into ends of soft close mechanisms,
aligned with fastening holes.
3. Fasten the soft close to the track using the supplied M4 x 35mm
socket cap screws ⑲, M6 washers ⑳ and M4 locking nuts .
4. Fasten with supplied 3mm Allen wrench ⑩.
Figure 17. Soft Close Orientation
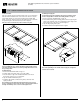
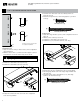
Fastening track to backer board.
1. Secure the rst and last holes in the track ② using a 90mm lag bolt
④, M8 washer ⑥, passive end stop ⑤ and standoff ⑦.
2. Secure the rest of the holes with a 90mm lag bolt ④, M8 washer ⑥
and standoff ⑦.
Figure 18. Track Assembly
STEP 6: FLOOR GUIDE INSTALLATION
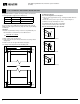
1. Reference Figure 15 on Page 7, to determine the installation location
of the oor guide, relative to open/closed positions of the system.
2. Using a pencil, mark 2" away from the wall and 1 1/2" in from the
interior edge of the opening, reference gure 20.
Note: If there is a baseboard, take its thickness into consideration.
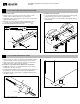
3. Predrill with a 3/32" bit, 1" deep. If installing into a concrete oor,
predrill with a 1/4" bit, 1 3/8" deep.
4. Assemble the oor guide ⑯ (if not pre-assembled) as shown in Figure 19.
If installing into concrete, use oor anchor ⑰ in predrilled hole.
5. Hand tighten the oor guide in place, ensuring the rubber base has
the ability to rotate.
Figure 19. Floor Guide Assembly
Figure 20. Location of the oor guide
④
⑥
⑦
④
⑤
⑥
⑦
②
⑰
⑯
⑯
2"
1 1/2"
Orient both soft close mechanisms with
movable catches toward center of track
⑲
⑱
⑳
⑩
Plastic Spacer
①
Rubber Base