
Installation Guide


Flat Head, #9 x 2 1 /2" (10/12)
⑧
7
JELD-WEN DesignGlide Barn Door Hardware System Installation
(JII-90003)
STEP 4: BACKER BOARD INSTALLATION
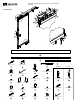
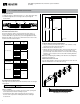
Figure 14. Predrilling Backer Board
Table 3. Determining Backer Board Offset
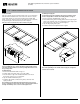
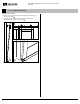
Figure 16. Backer Board Stud Alignment
Backer Board Height Door Height (without the door rails) + 4 1/4"
Table 4. Door Height/Backer Board Height
Predrill backer board.
1. Clamp the track ② to the backer board ① , 1" above the bottom edge.
2. Predrill through the 3/8" holes using a 3/16" bit, through the
backer board.
Determine backer board offset.
The backer board ① offset is referenced from the inner surface of
the door opening to the end of the backer board. This position will
coincides with the closed position of your new DesignGlide barn door.
Measure the width of your new door and match it to the value for the
backer board offset found in table 3.
Determine backer board placement.
The height of the backer board can be determined via the door height
using Table 4.
Notes to consider:
• The floor below barn door must be level. If not, take opening and
backer board measurements from highest point.
• If installing into thick carpet, firmly press the tape measure to
the base of the carpet before making the backer board height
measurement.
Kit Size
(Track Length)
Door Width
Backer Board
Offset
36" (72" track)
30" 8"
30 1/2" 7"
31" 6"
31 1/2" 5"
32 4"
32 1/2" 3"
33"
3"
33 1/2"
34"
34 1/2"
35"
35 1/2"
36"
Kit Size
(Track Length)
Door Width
Backer Board
Offset
42" (84" track)
36" 8"
36 1/2" 7"
37" 6"
37 1/2" 5"
38" 4"
38 1/2" 3"
39"
3"
39 1/2"
40"
40 1/2"
41"
41 1/2"
42"
Predrill the backer board for stud attachment.
1. Using a stud nder, mark all stud locations on the wall that overlap
with the placement of the backer board ①.
2. Mark stud locations on backer board.
3. With the backer board held in position, and leveled, predrill for the
included wood screws using 1/8" bit (two screws per stud, evenly
spaced vertically on backer board. The 72" kit comes with mounting
hardware ⑧ for 5 studs, the 84" kit comes with mounting hardware
⑧ for 6 studs).
Note: After completing all predrilling of the backer board, sand/paint/
stain the board if desired.
Attach backer board to the wall
Once the desired nish is achieved, fasten the backer board to the wall
with the included #9 x 2 1/2" at head screws ⑧.
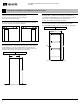
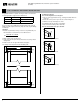
Figure 15. Backer Board Placement
Backer
Board
Height
Opening
Height
Floor Guide
Opening
Width
Backer
Board
Offset
①
②
1" 1"
①