
Instructions / Assembly
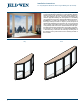

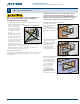
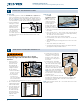


Table Of Contents

Installation Instructions
for Vinyl Bay/Bow Windows with Integral Nailing Fin (JII-90025)
5
INSTALL SILL PAN FLASHING SYSTEM
3
Prepare Sill
1. A pan ashing system (as dened in ASTM E2112) is required at the
sill prior to window/door product installation. Always allow water to
drain out of the pan and onto the building wrap, drainage plane or to
the exterior. NOTE: For a Bay and Bow window, self-adhered ashing
is recommended to create the sill pan (rather than a ridged sill pan).
2. If using self-adhered
ashing to create the
sill pan, measure the
width of the frame
from the interior to
nailing n and subtract
1/4". Transfer this
measurement from
the outside edge of the rough opening sill and draw a line all along
the rough opening sill. The line will address where the back of the
ashing will sit.
Shim the Sill
See Product
Installation Tolerance
Table for tolerances
1. Place the shims in the
sill pan as needed to
level the window and
prevent sagging or
bowing. Shims should
be aligned as dened
by the label on the window or as statedbelow:
• Shims (1/4" maximum) should be placed near the exterior edge of
the sill pan.
• Place one shim 3/4" to 1" from each side of the rough opening (if
the rough opening is sized correctly, this should be approximately
1/2" from the corner of the window).
• Shim in a manner that evenly supports the window.
• For mulled units, ensure there is a shim located 1/2" on each side
of the mull joint.
• There should always be a drainage path to the exterior out of the
sill pan.
• Shims can be held in place with sealant.
• Increased shim height may be needed or may interfere with bar/
grill alignment of adjacent windows/doors.
3/4" to 1" from side
of rough opening
Depth of window
minus 1/4"
Shims
Flashing
Interior
Measure frame
width
TEMPORARILY FASTEN AND SHIM PRODUCT
4
To avoid injury, use at least 2-people to install.
Adequately support the window until completely
fastened.
1. Fastener locations
around the interior
perimeter should
be pre-drilled and
countersunk prior to
setting the window
into the opening.
• Pilot holes should be
located 1 1/2" from
the interior edge.
• Holes should be
located 4" from
each corner and then 12" on-center and applied on all four sides
of the window frame.
• Countersink each pre-drilled hole to accept a #10 pan-head fastener.
2. Run a continuous bead of
sealant along the interior
surface of both nail ns.
3. Place the window onto
the shims and tilt into
the rough opening.
The shims must fully
and evenly support
the sill of the window.
Adjust the shims
as needed.
4. From the exterior, temporally
fasten the window by placing
a fastener 3"- 6" from one of
the upper corners of the nail
n. Make sure to fully support
the window.
5. From the interior, shim within
4"- 6" from each corner on both
sides of the window frame. Apply
additional shims to the sides
and head as necessary to ensure the
window position within the opening is
plumb, level, square and without twist.
NOTE: Shims can be secured with
sealant. All shims must be set back
from the interior of the window frame
a minimum of 1/4".
6. Fasten the jambs, head and seat board
through the pre-drilled and countersunk pilot holes using #10 pan
head fasteners. A shim should be located near each fastener to
prevent frame deection.
NOTE: Shims should be cut back 1/4"- 1/2" from the interior face of the
main window frame.
3"- 6"
Framing
Shim
Interior
Seat
Board
1/4" sealant
gap
Countersink
1 1/2"
4"
Sealant
Exterior