
Instructions / Assembly


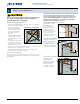


Table Of Contents

2
Installation Instructions
for Pre-Hung Exterior Entry Doors (JII106)
SAFETY AND HANDLING
Safety
• Read and fully understand ALL manufacturer’s instructions before
beginning. Failure to follow proper installation instructions may result in
the denial of warranty claims for operational or performance problems.
• DO NOT work alone. Two or more people are required. Use safe
liftingtechniques.
• Use caution when handling glass. Broken or cracked glass can cause
serious injury.
• Wear protective gear (e.g., safety glasses, gloves, ear protection, etc.).
• Operate hand/power tools safely and follow the manufacturer’s
operatinginstructions.
• Use caution when working at elevated heights.
• If disturbing existing paint, take proper precautions if lead paint is
suspected (commonly used before 1979). Your regional EPA
(www.epa.gov/lead) or Consumer Product Safety Commission ofces
provide information regarding regulations and lead protection.
Drilling, sawing, sanding or machining wood products
can expose you to wood dust, a substance known to
the State of California to cause cancer. Avoid inhaling
wood dust or use a dust mask or other safeguards
for personal protection. For more information, go to
www.P65Warnings.ca.gov/wood.
Materials and Door Handling
• Heed material manufacturer’s handling and application instructions.
• Handle in a vertical position; DO NOT carry at or drag on oor.
• DO NOT put stress on joints, corners or frames.
• Store door in a vertical, leaning position to allow air circulation;
DO NOT stack horizontally.
• Ensure the storage area is dry, well-ventilated and protected from
exposure to direct sunlight.
• Only install into vertical walls when conditions/sheathing are dry.
IF INJURY OCCURS, IMMEDIATELY SEEK MEDICAL ATTENTION!
MATERIALS AND TOOLS
JELD-WEN exterior window and door products should be installed in
accordance with JELD-WEN’s recommended installation and ashing
directions, which are shipped with the products or can be found on our
website: www.jeld-wen.com. NOTE: When using ashing, spray adhesive/
primer, sealant and foam products, we recommend using the same
manufacturer and verifying compatibility. It is the End User’s responsibility
to determine if dissimilar materials are compatible with the substrates in
the application.
Provided Materials
• 2 - #9 x 2 1/2" screws.
• Foam weatherstrip wedges (corner seal pads).
Needed Materials
• Lock set
• 10d galvanized casing nails (if plan to stain) or #8 x 2 1/2" truss head
screws (if plan to paint).
• Non-compressible or non-water degradable shims.
• Sill Pan: A pan ashing system (as dened in ASTM E2112) is required
at the sill prior to window/door installation. A sill pan should have a
positive slope, must be installed onto the sill of the R.O. in a weather-
tight manner and tied into the drainage plane of the building envelope.
For sill pans without a positive slope, place a 3/16"-1/4" tall plastic
shim 2" from each corner and no more than 8" on-center in between
(excludes Canada and potentially large door systems). If an aftermarket
sill pan is preferred, then we suggest the Manufacturer’s instructions be
followed.
• Backer Rod: 1/8" larger than the widest portion of the gap (used in
conjunction with sealant bead).
• Sealant: An exterior grade (High-Performing, Low VOC) sealant
is recommended for installation practices. Check with the sealant
manufacturer for color-match options and paintability.
• Polyurethane Low-Expansion Window and Door Foam: A low-
expansion, polyurethane window and door foam is recommended for
installation practices. Avoid using moderate to high-expansion products
as operational issues or damage may occur.
• Drip cap (if not supplied).
For installations into a Buck:
• Liquid applied ashing.
Needed Tools
• Tape measure • Construction stapler
• Utility knife • Hammer
• Level (4 ft. minimum • Screwdrivers
recommended)
• Nail set
• J-roller
• Square
• Caulking gun
• Pencil
• Drill with bits
• Pry bar