
Instructions / Assembly


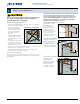
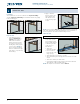

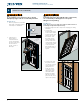


Table Of Contents

4
Installation Instructions
for Pre-Hung Exterior Entry Doors (JII106)
INSTALL DOOR (CONTINUED)
Temporarily fasten the door as follows:
4. For doors without a sidelite(s), secure the hinge jamb by placing
one 10d casing nail (or one
#8 x 2-1/2" truss head screw) horizontally centered in the hinge jamb
20" from the top and bottom (or just above the lower hinge) of the
door. DO NOT set nails/screws. For appearance reasons, fasteners can
be driven behind (but not through) the weatherstrip if desired. For
doors with sidelite(s), secure in a similar manner through the frame
and into the wall.
Inswing Door
#9 x 2-1/2" screw
Finish Installation
1. Re-check for smooth door operation and even spacing between the
door and jamb. Secure the strike jamb evenly between the rst two
already in place with two more 10d casing nails (or #8 x 2-1/2" truss
head screws) behind the weatherstrip.
NOTE: Steps 2 and 3 apply only to units with hinge jamb(s) against
the rough opening.
2. Install two provided
#9 x 2-1/2" wood
screws in the top
hinge through the two
holes closest to the
weatherstrip, driving
them through the
hinge jamb and into
the studs. Remove the
screws already in the
hinges to insert these
longer screws.
Outswing Door
#9 x 2-1/2" screw
5. Temporarily fasten the latch jamb by placing one 10d casing nail (or
one #8 x 2-1/2" truss head screw) horizontally centered in the latch
jamb 16" from the top and bottom of the door. DO NOT set nails/
screws. NOTE: Excludes doors with sidelites.
6. Ensure the door opens freely and that the space between the door
and the jamb is even on all sides. If necessary, adjust by loosening or
removing the strike jamb fasteners until there is even contact between
the slab and weatherstrip.
7. Verify the door unit is square, then securely fasten the hinge jamb
by setting the two nails or screws installed earlier. Add an additional
nail or screw centered between the rst two and one 4" from
eachcorner.
3. Test for ideal contact
between the door
sweep and the
threshold. Adjust
the threshold with a
Phillips screwdriver,
if needed. Turn the
screw clockwise to
reduce tension and
counterclockwise to
increase tension.
4. At the sill, pull the
weatherstrip up slightly
and apply a bead of
sealant (behind the
weatherstrip) at the
Wedge
intersection of the
jambs, brickmoulds,
thresholds and oor as
shown. The included
Sealant
foam wedges are
used to complete the
weatherstrip seal at
each bottom corner
between the jamb and operating slab(s) when closed. Position the
thick edge behind the weatherstrip, remove the backing paper and
adhere to the jamb asshown.
8