JENN-AIR DISHWASHER JDB-5 USE & CARE GUIDE TABLE OF CONTENTS Safety ....................................................................................... 1 Operating Tips .................................................................... 2-3 Loading .................................................................................. 3-8 2-Rack Loading ......................................................... 3-5, 8 3-Rack Loading ..............................................................
1. 2. 3. 4. 5. 6. 7 SAFETY 8. Read all instructions before using the dishwasher. Use the dishwasher only for its intended function. Disconnect electrical power to dishwasher before attempting to service. To avoid electrical shock hazard, the sides and back must be enclosed and the front panels must be attached before electrical power is applied to the dishwasher. Refer to the installation instructions for proper grounding procedures.
OPE Ti Before You Start Operating * Don't prerinse. Simply scrape off any hones or large food particles. (Models food soils (see page 15). . * Remove certain foods such as mustard, possible. These foods may cause rusting and pitting if allowed to remain in contact with the surface for with top touchpad If START/Cancel or combination front and 1. After loading the dishwasher and adding detergent, select the desired cycle and options by pressing the pads.
T| Operating the Dishwasher (iVlodels with cycle selector knob) 1. After loading the dishwasher and adding detergent, select the desired cycle by turning the cycle selector knob. Select options by pressing the buttons. The indicator lights for the options will illuminate. To cancel an option, press that button again. Adding a Forgotten For best cleaning, the forgotten item item should be added early in the cycle. 1. Grasp door handle and unlatch door without opening completely.
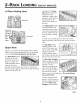
-RACK LOADI (SELECT MODELS] 10 Place Setting Load The edge of the StackRack (select models) is designed to hold stemware in place. Taller stemware will fit better on Upper Rack the right side as the upper rack is deeper on this side.
2-RACK LOADI G SELECT Lower Rack MODELS ) Utensil A variety of items such as dinner plates, mixing bowls, pots and pans and baking dishes can be loaded in this rack. Baskets Removable Basket Standard ([select For best cleaning Utensil models) results, prevent items from nesting together by placing some items in the basket with handles up and some with handles down. Load knives, Tall items such as bakeware and large platters can be placed on the left side.
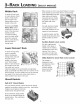
3-RACK LOADI (SELECT 10 Place Setting Load MODELS) like cups or juice glasses. Fold it up for taller items like glasses, bowls, plates, etc. The edge of the StackRack (select models) is designed to hold stemware in place. Taller stemware will fit better on the right side as the upper rack is deeper on this side. Upper Rack The Folding Tines (select models) located in the front 1 Saucer is loaded behind dinner right corner provide convenient loading space for large, bulky items like pots plates.
3-RAC LOADI G (:SELECT MODELS) Middle Rack A variety of items such When covers are not in use, place flatware in basket some handles up and some down to avoid nesting. Small, lightweight items like as cups, glasses, dinner plates, mixing bowls, pots and pans and baking dishes can be loaded in this rack. baby spoons and plastic measuring spoons should be placed in a section of the basket with cover closed.
LOAD| Adjnstable Racks [select models} The Adjustable Upper Rack (select models) and Adjustable Middle Rack can be raised or lowered to accommodate taller plates, platters, pans, etc. in the upper, middle or lower racks. Full size dinner plates can be loaded in the upper rack if it is in the lower position. Always unload racks before adjusting. To lower the rack: The racks can be removed when tall or oversized items need to be loaded into the middle or lower rack.
SE Hot Water For optimal cleaning and drying results, hot water is necessary. The incoming water temperature should be 120 ° F C49° CD to properly activate the detergent and melt greasy food soils. Add recommended amount of detergent to each cup as shown and close the detergent lid. To check the incoming water temperature, turn on the hot water faucet nearest the dishwasher and let it run into a glass in the sink.
LI CYCLES Cycles Choose the cycle that best describes your dishload Operating Tips, for how to begin the cycle). by pressing the corresponding Heavy Wash Long cycle for heavy food soils. 132 Normal Wash Medium cycle for average food soils. ClearScan T"Turbidity sensor is active with this cycle. 97-117 China/Crystal Short cycle for light food soils.
L|G CYCLES Cycle Options In addition to choosing Super Scrub (select models) Steam Clean (select models) Sanitize (select models) Hi Temp Wash (select models) Extra Rinse a cycle from page 10, choose as many available options as are needed Selected when washing loads with hard-to-remove food soils. Depending on which cycle is being used, this option adds heat and/or wash time to the wash cycle. Selected to deep clean and shine by using vaporized water.
LIG CYCLES, OPT|O Lights/Display Delay To cancel a Delay: The Delay option can be used to automatically start the cycle at a later time to reduce daytime heat When the delay is counting buildup in the home or to take advantage of reduced energy costs if available in your area. This option is also useful for conserving hot water at times of high household usage (showers, laundry). To cancel pad or button again. The indicator light will go out and the cycle will start or resume immediately.
CYCLES, LIG OPT| Control Lock Option cse=ect mode=s) The control touchpads can be locked to prevent unwanted use. If this feature is activated between cycles, the dishwasher controls are unlocked. cannot be operated until the If desired, the controls can be locked after a cycle or delay has started. Setting the Control 1. Press the Heated Lock: Dry pad for three seconds. 2. An indicator light next to the lock graphic will illuminate when the controls are locked. To Cancel: 1.
CYC L| Lights/Display cse=ect mode s) TIME REMAiNiNG Display (select models) Shows approximate minutes remaining in a cycle. The symbol "2H" will appear when cycle time is greater than 99 minutes. Cycle times shown in the numerical display (select models] will increase or decrease, based on each load's soil level, water temperature and selected options. CLEAN Light DRYING Illuminates at the end of the cycle and remains continuously.
CAR CLEAN| General Recommendations * The color from some tomato-based food soils may occasionally adhere to various components of the dishwasher interior, causing temporary discoloration. * The dishwasher interior is normally self-cleaning. Periodically check the bottom of the dishwasher tub to see if any large particles remain. To minimize this: • Remove excess tomato-based • Wipe the edge of the inner door liner to remove any food soil splashes which occurred during loading. dishes before loading.
T CHECK THESE Dishwasher POINTS will not fill TO HELP SAVE YOU TiME AND MONEY. • Press the START/Cancel pad to start the dishwasher. • Be sure door is latched securely. • Be sure the water is turned on. • Check that the pad is properly selected for a cycle. • Check your home's circuit breaker or fuse box. • Check inlet hose for a kink. • Check water valve inlet for sediment and clean if necessary.
TROU Display time suddenly drops or increases by several minutes [select models) • This is normal when the Sensor Clean (select models) or Normal Wash cycle is selected and the dishwasher decides to skip or add a drain and refill. Indicator • The countdown display (select models) flashes after a cycle is selected until the START/Cancel pad is pressed. • The countdown display (select models) and the delay indicator flash after a delay is selected until the START/Cancel pad is pressed.
TROU items not properly dried/ moisture is present on the dishwasher interior after the dry cycle • Be sure Heated Dry is selected. • Water droplets may form on the inner door as part of the drying process. • Use a rinse aid separate from the detergent like Jet Dry* or Cascade Rinse Aid* regularly, to improve drying. Turn the rinse aid selector toward the MAX setting. • Check water temperature (pg. 9). • Select Sanitize. • Increase detergent amount to match water hardness (pg. 9). • Load properly. (pg.
JENN-AII DISHWASHERWARRANTY ONE YEAR LiMiTED WARRANTY For one year from the date of purchase, when this major appliance is operated and maintained according to instructions attached to or furnished with the product, JenmAir brand of Maytag Corporation or Maytag Limited (hereafter "JenmAir") will pay for factory specified replacement parts and repair labor to correct defects in materials or workmanship. Service must be provided by a JenmAir designated service company.
LAVE-VAISSELLE JENN-AIR JDB-5 GUIDE D'UTILISATiON ET D'ENTRETIEN TABLE Securit6 DES MATIERES ................................................................................... 21 Conseils d'utilisation ...................................................... 22-23 Chargement ....................................................................... 23-28 Chargement de deux paniers .......................... 23-25, 28 Chargement de trois paniers ..................................
1. Lire la totalit6 des instructions avantd'utiliser le lavevaisselle. 2. Utiliser le lave-vaisselle uniquement pour les applications. D6brancher le lave-vaisselle avanttout entretien. 3. 4. Pour 6viter tout risque de choc 61ectrique, les cOt6s et rarri_re dolvent 6tre ferm6s et le panneau avant dolt 6tre fix6 avant de brancher le lave-vaisselle. Se reporter aux instructionsd'installation pour les m6thodes correctes de mise b la terre. 5.
CONSEILS DtUTILISATION Avast de commel]cer * Ne pas pr_rincer. II suffit de jeter os et gros morceaux de nourriture. 3. Pour annuler un cycle en cours de fonctionnement, appuyer une fois sur la touche START/Cancel. Le lave-vaisselle procede _ une vidange puis s'arrete. * Si le lave-vaisselle est raccorde _ un broyeur dechets, veiller _ ce que celui-ci soit vide avant de mettre le Jave-vaisselle en marche. * Gratter Jes taches tenaces aliments & base de tomato laiss_es par los (volt page 35). .
CONSE|LS DtUT|L|SAT|ON 3_ Pour annuler un cycle en cours de fonctionnement, soigneusement deverrouiller la porte sans I'ouvrir completement et attendre que la circulation de I'eau s'arrete. Appuyer une fois sur la touche START/ Ajout d'un article oubiie Pour de meilleurs resultats de nettoyage, I'article oublie devra etre ajoute au debut du cycle. Cancel (IVlise en marche/Annulation) puis fermer la porte. Le lave-vaisselle precede _ une vidange, puis s'arrete.
CHARGEIVlENT DE DEUX 10 Converts CCERTA|NS MODULES[ Le bord de 1'6tagere Stack-Rack (certains modeles) est congu pour retenir les verres _ pied en place. II est preferable de placer les verres dont le pied est plus long _ droite, car le panier superieur est plus profond _ cet endroit.
CHARGEMENT BE BEUX CCERTA|NS MOD LES Pauier iuf rieur Pauiers pour usteusiles II peut recevoir une varlet6 d'articles, des assiettes Punier _ ustensiles (curtains standard, amovible modules) diner, des bols m61angeurs, des casseroles et des plats.
CHARGEMENT DE TROIS 10 Couverts CERTA|NS MOD LES ) Le bord de 1'6tagere Stack-Rack (certains mod61es) est congu pour retenir les verres _ pied en place. II est preferable de placer les verres dont le pied est plus long _ droite, car le panier sup6rieur est plus profond _ cet endroit.
CHARGEMENT DE TROIS Partier interm diaire CCERTAJNS MOD LES ) S'assurer que les articles minces et pointus ne d@assent pas du panier. Sinon, ils risquent de bloquer le bras de lavage. II peut recevoir une vari6t6 d'articles, des tasses, des verres, des assiettes _ diner, des bols Lorsque les couvercles ne sont pas utilises, placer les couverts dans le panier avec certains manches vers le haut et certains vers le bas pour ne pas les emboiter les uns dans les autres.
CHARGEMENT Enlbvement du partier avec buttes (certains modbles) : Paniers r glables (certains modbles) . Le Partier sup_rieur r_glable (certains modeles) et le Partier iatermediaire reglable peuvent etre releves ou & poussoir Faire rouler le panier vers soi de '4 _ '/_de la distance. 2. Enlever la butee en plastique _ I'extremite de chaque glissiere. Pour ce faire, appuyer vers I'interieur (vers abaisses pour placer de grandes assiettes, des plats de service, des marmites, etc.
T|L|SAT|ON Eau chaude Ajouter la quantite recommandee de detergent dans chaque tasse comme il est illustre et fermer le couvercle du compartiment. Pour des r_sultats de nettoyage et de s_chage optimaax, reaa chaade est n_cessaire. La temperature de I'eaa d'arriv_e dolt se troaver entre 49 °C (120 °F) pour activer correctement le d_tergent et faire fondre la salet_ et la graisse.
CYCLES, OPTIONS ET TEMOINS LUMINEUX Cycles Choisir le cycle qui convient le mieux _ votre vaisselle en appuyant sur la touche correspondante. Conseils d'utilisation, pour la mani6re de d_buter le cycle.} Heavy Wash (Lavage intense} Cycle long pour vaisselle tr6s sale. Normal Wash (Lavage normal} China/Crystal (Porcelaine/Cristal) Sensor Clean (Nettoyage capteu0 (certains modeles} (Voir page 22, 132 2 lavages/3 ringages Cycle moyen pour vaisselle normalement sale.
CYCLES, OPTIONS ET TI MO|NS LUM|NEUX Options En plus de choisir un cycle sur la page 30, choisir, parmi les options suivantes disponibles, n_cessaires selon la charge en cours. Super Scrub (certains mod61es] routes celles qui seront S61ectionner cette option Iors du lavage de vaisselle avec des taches tenaces. Selon le cycle s61ectionn& cette option augmente la dur6e du lavage et/ou la temp6rature.
CYCLESy OFflONS Indicateurs affichage ET " lumineux/ Delay [D marrage differS] L'option Delay peut etre utilis6e pour mettre le cycle automatiquement en marche, plus tard, pour r6duire I'accumulation de chaleur pendant la journ6e dans la Annulation d'un demarrage cycle commencera Annulation d'un d_marrage immediatement. diff_r_ et d'un cycle : de commande) pour Ou ,, Appuyer deux fois sur la touche START/Cancel arr¢ter le lave-vaisselle sans evacuer I'eau.
CYCLES, OPTIONS ET TI MOiNS Option de verrouillage de commandes Ccertains Les touches de commande modbJes) peuvent etre verrouillees pour empecher toute utilisation non autorisee. Si cette fonction est activee entre les cycles, le lave-vaisselle ne peut pas etre utilise jusqu'au deverrouillage des commandes. Au besoin, les commandes peuvent etre verrouillees apres le demarrage d'un cycle ou d'un depart differe. R_glage du verrouillage des commandes : 1.
T moins lumineux/affichage Affichage de la DURI_E RESTANTE (certains modeles) coer=amod .s =es) Indique le nombre de minutes approximatif restantes dans un cycle. Le symbole <<2H 7)apparait Iorsque la duree d'un cycle est superieure _ 99 minutes. Les durees de cycle apparaissant a I'affichage numerique (certains modSles) augmentent ou diminuent selon le niveau de salet6 de chaque charge, la temperature de I'eau et les options choisies.
ET NETTOYAGE Recommandations d'ordre g6n6ral • L'interJeur du lave-vaisselle est normalement * La couleur de certains aliments _ base de tomate peut parfois adherer _ certains composants _ I'interieur du lave-vaisselle et provoquer une deceleration temporaire. autonettoyant. Verifier periodiquement le fond de la cuve du lave-vaisselle pour voir si des residus importants ne sent pas passes _ travers le filtre.
DC'PANNAGE VERIFIER LES POINTS SUIVANTS POUR ECONOMISER TEMPS ET ARGENT. Le lave-vaisselle ne se remplit pas • Appuyer sur START/Cancel (Mise en marche/Annulation) pour mettre le lave-vaisselle en marche. • S'assurer que la porte est correctement ferm6e. • S'assurer que le robinet d'eau est ouvert. • V6rifier que la touche est correctement s61ectionn6e pour un cycle. • V6rifier les fusibles ou disjoncteurs de I'habitation. • V6rifier que le tuyau d'arriv6e d'eau n'est pas entortill6.
D PANNAGE La dur_e aflichee augmente ou • C'est normal Iorsqu'un cycle Sensor Clean (Nettoyage capteur] (certains mod61es] diminue rapidement de plusJeurs ou Normal Wash (Lavage normal) est s61ectionn6 et que le lave-vaisselle d6cide de minutes (certains mod_les) passer ou d'ajouter une 6vacuation ou un remplissage.
D PANNAGE Les articles laves dons le lave= vaisselle (ou la cuve du lave= vaisselle elle=rn_rne) sont tach_s/d_color_s •Les ustensiles ou les casseroles en aluminium peuvent laisser des marques Iorsqu'elles touchent d'autres articles. Laisser un espace entre ces articles. • Des d@6ts de fer dans I'eau peuvent laisser un film jaune, orange ou brun sur la vaisselle ou la cuve du lave-vaisselle. Un filtre peut 6tre n6cessaire; v6rifier avec votre compagnie d'approvisionnement en eau.
GARANTIE DESLAVE-VAISSELLE JENN-AIR GARANTIE LIMITEE DE UN AN Pendant un an & compter de la date d'achat, torsque ce gros appareil menager est utilis6 et entretenu conformement aux instructions jointes a ou fournies avec te produit, Jenn-Air, marque de Maytag Corporation ou Maytag Limited (ci-apres design6e "Jenn-Air") paiera pour tes pieces de rechange specifi6es par l'usine et ta main-d'oeuvre pour corriger les vices de materiaux ou de fabrication.
LAVAVAJILLAS DE JENN-AIR JDB-5 GUiA DE USO Y CUIDADO TABLA Seguridad Sugerencias DE MATERIAS .................................. de funcionamiento Carga del lavavajillas 41 ............. 42-43 ...................... 43-48 Carga del lavavajillas de dos canastillas .... 44-45 Carga del lavavajillas de tres canastillas .... 46-47 Uso del lavavajillas ........................... Ciclos, opciones y luces 49 ................... 50-54 Lo que puede y no puede ser lavado ............
| Lo que necesita saber sobre las instrucciones de seguridad Lasadvertencias e instrucciones irr_portantes sobre seguridad que aparecen en este manual no est4n destinadas a cubrir todas las posibles circunstancias y situaciones que puedan ocurrir. Se debe ejercer sentido com_n, precauciOn y cuidado cuando instale, realice mantenimiento o haga funcionar el lavavajillas. Siempre pOngase en contacto con fabricante si surgen problemas o situaciones que usted no comprenda.
SUGERENCIAS DE FUNCIONAMIENTO Antes de cornerlzar 3. Para cancelar un ciclo en curso, oprima una vez la tecla 'START/Cancel'. El lavavajillas se desaguar4 * No enjuague los platos antes de colocarlos en el lavavajiJlas. Solarnente retire los huesos y los restos de aJimentos y luego se apagar& Para apagar el lavavajillas sin desag(]e, oprima dos veces la tecla 'START/ Cancel'. grandes.
SUGERENC|AS DE FUNC|ONAM|ENTO 3. Para cancelar un ciclo en curso, abra con cuidado la Como agregar an articulo oividado puerta pero no completamente y espere hasta que termine la circulaciOn del agua. Oprima una vez la tecla 'START/Cancel' (Puesta en Marcha/ Para una mejor limpieza, el articulo olvidado agregado a comienzos del ciclo. Cancelar) y luego cierre la puerta.
CARGA [MODELOS Cubiertos SELECTOS ) El borde del soporte 'Stack Rack' (modelos selectos) ha sido diseSado para 10 Personas para sujetar las copas en su lugar. Las copas m_s altas quedar_n mejor en el lado derecho pues la rejilla superior es m_s profunda Rejina Superior en ese lado.
CARGA DEL LAVAV/LJ|LLAS DE DOS CANAST|LLAS CMODELOS SELECTOS ) Rejilla inferior Cestillas de los utensilios En esta rejilla se pueden acomodar una variedad de CestiUa articulos tal como platos de servir, tazones, ollas y Para obtener los mejores (modeios altos, tales para utensiiios seiectos) los mangos hacia abajo.
CARGA DEL LAVAV/LJ|LLAS DE TRES (MODELOS Cnbiertos SELECTOS ) para 10 Personas El borde del soporte 'Stack Rack' (modelos selectos) ha sido dise_ado para sujetar las copas en su lugar. Las copas m_is altas quedar_in mejor en el lado derecho pues la rejilla superior en ese lado.
CARGA CANASTILLAS DE TRES CMODELOS SELECTOS ) Aseg[irese de que los articulos delgados y de punta fina no se extiendan fuera de la cestilla. Esto Rejilla intermedia En esta rejilla se pueden acomodar una variedad de podria bloquear el brazo rociador. articulos tales como tazas, Cuando las tapas no estan en uso, coloque los cubiertos en la cestilla, algunos mangos hacia arriba y otros hacia abajo para evitar que se aniden unos contra otros.
CARGA DEL LAVAVA.J|LLAS Rejillas ajustables (modeJos Desmontaje intermedia selectos) La Rejilla superior Rejilla intermedia ajustable ajustable (modelos selectos) y la pueden ser levantadas Las rejillas pueden ser retiradas cuando sea necesita colocar articulos altos o de gran tamale en la rejilla superior o intermedia. Retire todos los articulos de la o bajadas para acomodar plates m_is altos, bandejas, elias, etc. en la rejilla superior, intermedia o inferior.
DEL LAVAVAJ|LLAS eficacia Agua caliente Para una limpieza y secado 6ptimos, es necesario usar agua caJiente. La temperatura deJ agua de entrada debe set entre 120 ° F [49 ° C) para activar bien el detergente y derretir alimentos grasosos. Para verificar la temperatura la suciedad deJ detergente lavavajiJlas contra agua dura. y preteger Ins piezas del el da_o que puede causar el Agregue la cantidad de detergente recomendada cada taza, come e muestra y cierre la tapa.
CICLOSy OPCiONES Y LUCES Ciclos Seleccione el ciclo que describa mejor la carga del lavavajillas oprimiendo Funeionamiento, para obtener las instrucciones como comenzar el ciclo). la tecla correspondiente. (Ver p_gina 42, 'Heavy Wash' (Lavado intenso] Este es un ciclo prolongado para suciedad excesiva de la vajilla. 132 2 lavados/3 enjuagues Este es un ciclo de mediana duraciOn para suciedad normal de la vajilla. El Sensor de Turbiedad 'ClearScan'"' est_ activo durante este ciclo.
CICLOSy OPC|ONES Y LUCES Opciones de los ciclos Adem_is de seleccionar un ciclo de la p_igina 50, seleccione tantas de las opciones siguientes con el ciclo seleccionado co[no scan necesarias de acuerdo con la carga del lavavajillas.
C|CLOS OPCiONES Y LUCES Luces/indicador 'Delay' (Lavado diferido) Cancelaci6n Cuando el lavado diferido est_ en la cuenta regresiva, oprima nuevamente la tecla o el bot0n 'Delay'. La luz indicadora se apagar_ y el ciclo comenzar_ o se reanudar_ inmediatamente.
C|CLOS OPCiONES Y LUCES Opci6n 'ControJ Lock' CBioqueo de los controles) Cmodelos selectos) Las teclas de control pueden ser bloqueadas evitar el uso indeseado. Si esta caracterfstica para es activada entre ciclos, no se podr_i hacer funcionar el lavavajillas hasta que no se desbloqueen los controles. Si se desea, los controles pueden ser bloqueados despu6s de haber comenzado un ciclo o un lavado diferido. Programaci6n del bloqueo 1.
Luces/Indioador cmodelosselectos) Indicador de 'TIME REMAINING' 0-iempo Restante) (modelos selectos] Muestra los minutes aproximados que faltan para el tGrmino de un ciclo. El simbolo "2H" aparecera cuando el tiempo del ciclo sea superior a 99 minutes. Los tiempos de los ciclos mostrados en el indicador numGrico (modelos selectos) aumentan o disrninuyen, de acuerdo con el nivel de suciedad de cada carga, con la temperatura del agua y con las opciones seleccionadas.
CUiDADO Y LIMPIEZA Recomendaciones generales * El color de algunas manchas de alimentos a base de tomate pueden ocasionalmente adherirse a los diversos componentes del interior del lavavajillas, causando descoloraciOn temporal. • El interior del lavavajillas por Io general se limpia por si solo. Revise peri6dicamente el fondo de la tina del lavavajillas para ver si hay particulas grandes.
LOCAL||C|0N Y SOLUC|0N DE f LEA ESTOS PUNTOS PARA AYUDARLE A AHORRAR T|EMPO Y DINERO. El lavavajillas no se llena • • • • • • • Oprimala tecla 'START/Cancer (Puestaen marcha/Cancelar)para ponerlo en marcha. Cerci6rese de que la puerta est6 firmemente cerrada. Cerci6rese de que el agua est6 conectada. Verifique que se haya seleccionado la tecla correspondiente aun ciclo. Verifique el disyuntor o la caja de fusibles de su hogar. Verifique si la manguera de admisi6n est4 torcida.
LOCALIZACIONY SOLUC|ON La horn en el indicador digital desciende repentinamente o aurnelllta [modelos elR varios iminutos • Esto es normal cuando se selecciona el ciclo 'Sensor Clean' (modelos selectos) o 'Normal Wash' (Lavado normal) y el lavavajillas decide omitir o agregar un desag(Je y Ilenado.
LOCAL||C|6N Y SOLUC|6N DE AVER|'AS Los articulos que se lavan en el lavavajillas o la tina del lavavajillas est_n manchados o descoloridos • Los utensilios u ollas de aluminio pueden dejar marcas cuando rozan otros articulos. Deje un peque_o espacio entre los artfculos. • Los depOsitos de hierro que contiene el agua pueden dejar una pelfcula amarilla, marrOn o naranja en los platos o en la tina del lavavajillas. Puede que sea necesario usar un filtro; consulte con una compa_fa de tratamiento de agua.
GARANTIA DE LA LAVAVAJILLASJENN-AIR GARANTJA LIMITADA DE UN AI_O Durante un a_o a partir de ta fecha de compra, siempre y cuando se de a este electrodomestico principal un use y mantenimiento de conformidad con las instrucciones adjuntas o provistas con et producto, ta marca Jenn-Air de Maytag Corporation o Maytag Limited (en lo sucesivo denominada "Jenn-Air") se hara cargo det costo de tas piezas de repuesto especificadas de fabrica y det trabajo de reparaci6n para corregir defectos en los materiates o en